How to Capture Screen on Windows and Mac
Being able to capture your screen can be a beneficial skill for a variety of purposes. It is useful for creating video tutorials, sharing captivating content with friends, and solving technical problems.
In this article, we will discuss how to capture your screen on both Windows and Mac. No matter which operating system you use, screenshots can save you time and make sharing information easier. So let's dive into the details and master this useful skill.
Icecream Screen Recorder
Have you ever wanted to capture your screen while working on your computer? Maybe you need to share a presentation or simply save important information but you don't know how?
In any situation, Icecream Screen Recorder stands out as an exceptional way of capturing and exporting your desktop as a video or image file.
How to take a screenshot on Windows with Icecream Screen Recorder
- Download screen capture software for Windows and install it.
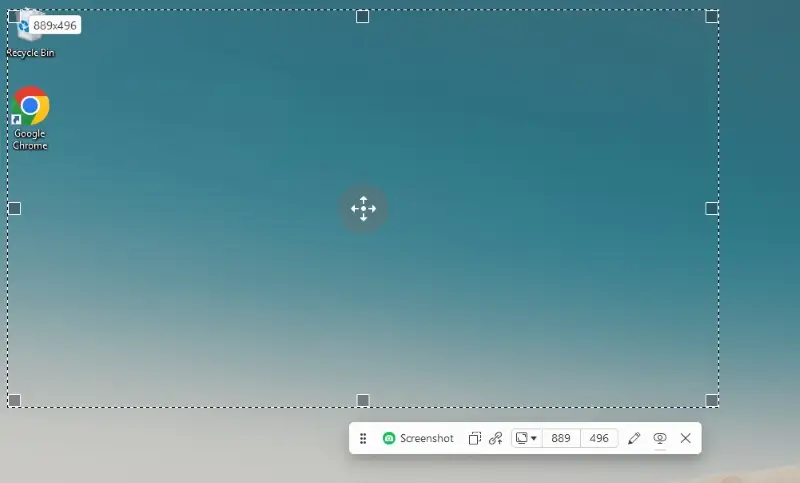
- Open the program and press the "Screenshot" button in the side menu.
- Select and adjust the area by dragging the corners.
- In the toolbar, you can also choose to include the image from your webcam and use a drawing panel.
- When you are done preparing, click the green "Screenshot" button.
- Now you can open the image in the built-in editor, save it to your PC, or share it by URL.
Pros:
- Easy to use. Boasting a simple and intuitive design, the program caters to the needs of all users, regardless of their skill level.
- Flexible screen capture. You can capture screenshots in various modes, including full-screen, selected areas, or even use auto area detection recording mode. This flexibility ensures that you can tailor the screenshot to your specific needs.
- Clipboard support. Captured images can be easily copied to the clipboard, allowing for quick pasting into other applications without the need to save them as files.
- Annotation feature. The recorder provides annotation and drawing tools that enable users to add text, shapes, and drawings directly onto the captured screenshot. This feature is valuable for highlighting specific elements or providing context.
- Output formats. The application supports saving screenshots in PNG and JPG. You can choose the format that best suits your preferences and requirements.
- Multiple monitor support. If you have multiple monitors, the screenshot software allows you to choose which monitor to capture, providing flexibility for users with extended desktop setups.
- Screen recording features. In addition to screenshots, the program includes screen recording features. This versatility makes it a comprehensive method for both static and dynamic content capture.
To summarize, Icecream Screen Recorder serves as a trustworthy and intuitive solution for screen capturing needs. Its customizable features and editing capabilities make it stand out among similar screen capture programs.
Game Bar
Game Bar proves to be an invaluable asset for saving your screen. It allows you to effortlessly capture screenshots and record your desktop without relying on third-party software.
How to capture screen with Game Bar on Windows
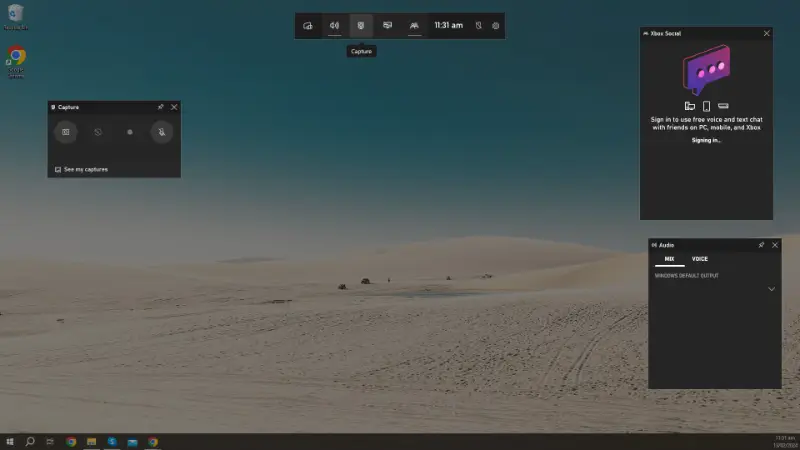
- While in a game or other supported full-screen application, press the Windows key + G to open the Game Bar.
- Click the "Capture" button in the top part of the screen to open a new window.
- Hit the camera icon or press the Windows key + Alt + PrtScn to capture your screen.
- You can find your screenshot in the
C:\Users\Username\Videos\Captures.
Pros:
- This is a built-in screen capture tool on Windows 10 and 11, making it available for users without the need for additional software.
- The ability to open the application quickly using a keyboard shortcut provides fast access to the screenshot feature, especially when recording games.
- The tool to capture screen operates as an overlay, minimizing interruptions to the gaming or application experience. It doesn't require users to switch to another program.
Cons:
- In some cases, the screen capture software might not correctly identify non-gaming apps, limiting its functionality.
- It only allows for full-screen applications. You can't use it to capture specific areas of the screen or content from a windowed mode.
With Game Bar, you no longer have to worry about missing out on epic moments during gameplay. It's a convenient and hassle-free way to capture your screen while gaming.
Snipping Tool
If you're someone who frequently needs to capture screenshots, Snipping Tool is a handy feature to have in your arsenal. It's a built-in program in Windows that allows you to take screenshots of any part of your desktop and save it as an image file.
How to use Snipping Tool to capture screen on a computer
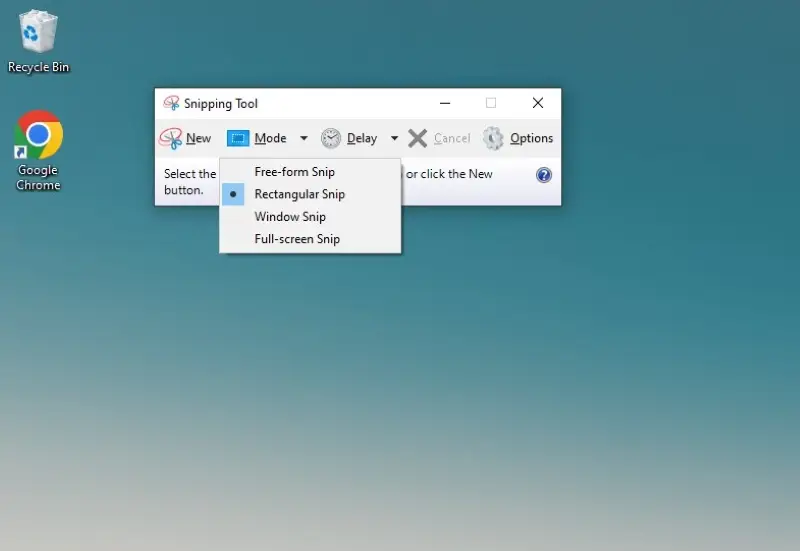
- To access the app, simply type "Snipping Tool" in the search bar on your computer and click on the result.
- Select the desired screenshot type from the "Mode" menu (Rectangular, Free-form, Window, or Full-screen Snip).
- Click "New", drag your cursor over the area you want to capture, and release.
- Annotate or mark up the screenshot using the available tools.
- Go to the "File" menu and choose "Save As" to export the image.
Pros:
- The screen capture software comes pre-installed with most Windows versions.
- The interface is straightforward and easy to use.
- It allows users to annotate parts of the captured screenshot using basic drawing tools.
- The built-in delay option can be useful for saving dynamic elements or tooltips that appear after a brief pause.
Cons:
- Users looking for a tool that combines both screenshot and screen recording on Windows functionalities may need to explore other applications.
Overall, it is a versatile tool for not just capturing screenshots but also editing them. Next time you find yourself in need of a screen capturing program, keep in mind the reliable Snipping Tool at your disposal.
Keyboard shortcuts for PC
In Windows, various hotkey combinations can be used to capture your screen quickly. Below are some common shortcuts for different types of screen captures.
Basic shortcuts
- PrtScn (Print Screen)
Pressing the PrtScn key captures the entire screen and copies it to the clipboard. You can then paste it into an image viewer or editor or another document.
- Alt + PrtScn
Pressing this combination captures the active window and saves it to the clipboard.
Advanced screenshot shortcuts
- Windows key + PrtScn
Captures the entire screen and automatically saves the screenshot as a file. The file is saved in the "Screenshots" folder within the "Pictures" library.
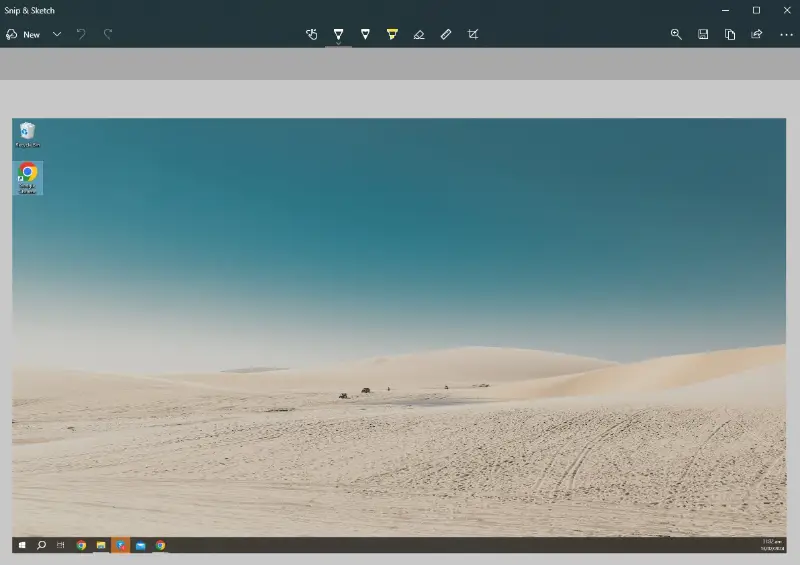
- Windows key + Shift + S
This will open Snip & Sketch, allowing you to capture a specific region of the screen. This shortcut is available on Windows 10 and 11.
Clipboard Operations
- Ctrl + V
After using Print Screen or Alt + PrtScn to capture a screenshot to the clipboard, press Ctrl + V to paste the image into an editor, document, or other applications.
Command Line
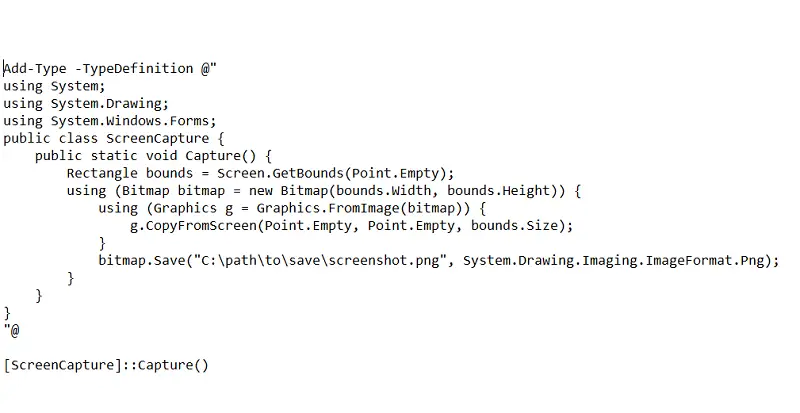
You can also use PowerShell, a built-in Windows command-line tool.
- Press Win + X and select "Windows PowerShell (Admin)", or search for it in the "Start menu".
- Enter the script to capture the screenshot of the entire desktop and save it as PNG.
- After pasting the script into PowerShell, press Enter to run it.
Keyboard shortcuts on macOS
Capture entire screen
- Command (⌘) + Shift + 3
The screenshot is saved to your desktop by default.
Capture selected area of the screen
- Command (⌘) + Shift + 4
Drag to select the area you want to capture. Release the mouse button to take the screenshot.
Screenshot of a specific window
- Command (⌘) + Shift + 4
Press the Spacebar and click on the window you want to capture.
Preview
Preview is a built-in macOS application primarily used for viewing and editing PDF documents and pictures. However, it is a versatile tool that also allows you to capture screenshots and provides basic image editing capabilities.
How to take screenshot on Mac in Preview
- Open the Preview application.
- Go to the "File" tab and choose "Take Screenshot."
- Select the type of screenshot you want.

Pros:
- You can make simple modifications to your screenshots, such as adding text, shapes, or highlights.
- Preview comes pre-installed on every macOS system, so you don't need to download or install any additional software.
- In addition to screen capturing, it is a versatile program for viewing and annotating PDFs.
Cons:
- The application is designed for static images. It can't capture dynamic content or record your screen.
Touch Bar screenshot on Mac
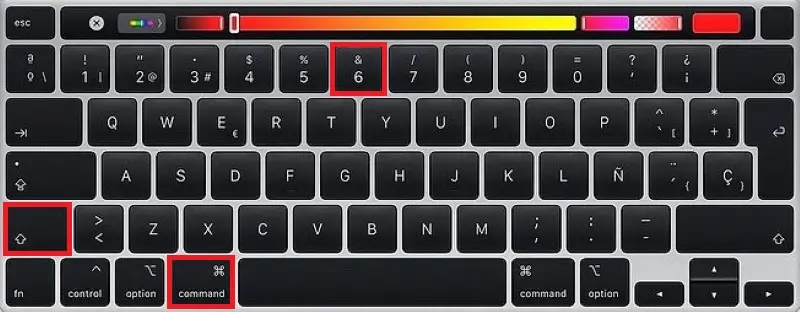
On MacBook Pro models equipped with a Touch Bar, a screenshot of the Touch Bar itself can be done using the built-in macOS tools.
How to create a screenshot on macOS using Touch Bar
- Press and hold the Command (⌘) + Shift + 6 keys.
- The screenshot file is saved on your desktop by default.
Capture screen tips
- Leverage GPU power for faster performance, especially with high-res screenshots.
- Use PNG for lossless quality, JPEG for smaller sizes.
- Opt for 30+ FPS for dynamic content, 15 FPS for still images.
- Utilize a clear naming convention and folder system for easy access.
- Align the capture with your screen's resolution for optimal clarity.
- Select or combine specific displays in multi-monitor setups.
- Enhance clarity with post-editing tools like highlights or text.
- Ensure captures are free of artifacts before storing or sharing.
FAQs on how to capture your screen
- How do I change the default screenshot folder?
- On Windows, right-click the "Screenshots" folder, select "Properties" and choose the "Location" tab. On, macOS, click Command (⌘) + Shift + 5 and go to the "Options" menu to set the new folder.
- How can I capture delayed screenshots on Mac?
- In macOS Mojave or later, use the keyboard shortcut Command (⌘) + Shift + 5 to open the Screenshot app and set a timed delay in the "Options" tab.
- What is the difference between a screenshot and a screencast?
- A screenshot is a static image of your screen. A screencast is a recording that captures your screen activity along with audio, typically used to demonstrate some process.
- What file formats should I use for saving screenshots?
- Common formats include PNG, JPEG, or GIF files. PNG is preferred for high-quality images without compression loss. JPEG offers smaller file sizes but sacrifices some image quality. GIFs are often used for sharing short, simple screen recordings or animations.
- How do I capture a screenshot of a specific program on Windows?
- Press Alt + PrtScn to capture only the currently active window. The screenshot is copied to the clipboard and can be pasted into an image editor or document.
- What should I do if the screen capture tool isn’t working?
- Check if the program has the necessary permissions and if there are any updates available. Restarting your device or the application might also help if the screen recording is not working.
Conclusion
In summary, knowing how to take a screenshot on both Mac and Windows is a fundamental skill that comes in handy for various purposes. Don't forget to check your screenshot's quality and save it in a suitable format.
Choosing the right method depends on your specific needs and preferences. Native keyboard shortcuts provide a seamless way to capture screen for free. If you require advanced features or want more control over your screenshots, third-party applications are available.


