How to Screen Record on macOS
Understanding the process of screen recording on Mac can help you create engaging YouTube videos, save important presentations, and even create tutorial videos.
Learning how to use the video recording feature on Mac computers is easy and can help you become more productive with your projects.
In this article, we will show you 9 easy-to-use and free screen recorders for Mac. Each method has different functionality, so review them all to determine which one is best for you.
Tools for screen recording on macOS: comparison table
| Program (tool) | Desktop/web | Unique features | Cost of PRO | Rating |
|---|---|---|---|---|
| Video Candy |
Web
|
Simple online tool | Free PRO from $4/month | 5.0 |
| Screenshot toolbar |
Desktop
|
Native option | Free | 4.7 |
| OBS Studio |
Desktop
|
Advanced tools for live streaming | Free | 4.7 |
| Vimeo |
Web
|
AI assistant for scripting | Free PRO from $12/month | 4.5 |
| Vidyard |
Desktop
Web
|
Integration with marketing tools | Free PRO from $19/month | 4.5 |
| QuickTime Player |
Desktop
|
Build-in macOS application | Free | 4.0 |
| Loom |
Web
Desktop
|
Designed for producing educational materials | Free PRO from $12.50/month | 4.0 |
| Zoom |
Web
Desktop
|
Capable of hosting online webinars | Free PRO from $13.32/month | 3.9 |
| ScreenFlow |
Desktop
|
Multi-app recording | $169 | 3.8 |

How we picked macOS screen recorders
To compile this list, we looked at different options for macOS screen recording. Each of the described tools will help you capture your display activities but also has something unique. For example:
- Offers additional video editing features;
- Is a built-in application;
- Is professional video recording software;
- Has a tool for creating educational materials;
- Or allows instant publishing to the channel.
Depending on the needs you have for creating your display capture, you may prefer one over the other.
1. Video Candy
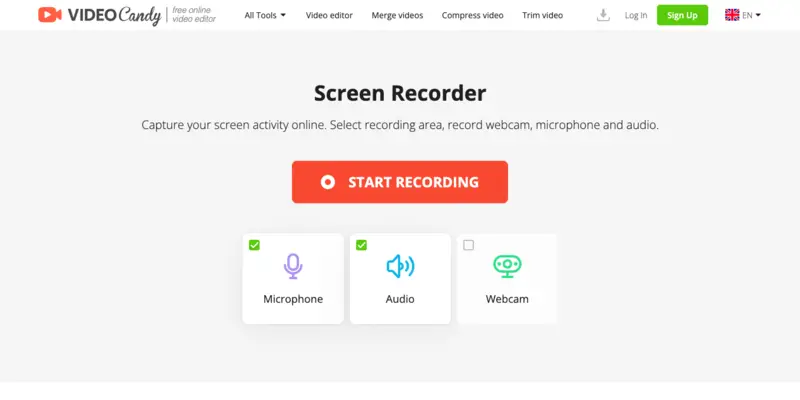
Video Candy is a web platform that provides tools for video and audio editing. All the work is conveniently done online. Such a way of recording your screen can be useful for capturing bug reports when using applications or websites.
How to record screen online with Video Candy
- Go to the online screen recorder.
- In the main menu, select the settings: allow the website to use your "Microphone", computer "Audio", and "Webcam".
- When everything is ready, hit "Start Recording". You'll be asked to give permission to the screen recorder to capture your activity. In addition, you need to pick the recording area - "Tab", "Window", or "Entire Screen".
- While recording, you can move between tabs and windows, pause, and resume the screen capture. When you're done, click "Stop Recording".
- After a short processing, your video recording will be available for download. You can also pick the "Continue editing" option and work on your video: trim, crop, add music, extract audio, etc.
Pros:
- Simple and accessible. The screen recorder has an intuitive interface and is available online.
- Affordable. You can video record your computer display for free.
- Cross-platform support. Since it's an online tool, you can use it on any device and any operating system.
- Additional features. Video editor is available for customizing videos after you finish recording.
- No installation required. Works directly in the browser, so there’s no need to download any software.
2. Screenshot toolbar
Recording your screen with the Screenshot toolbar is by far the fastest method. Despite its convenience, it does come with certain limitations. However, if all you need is a quick capture of your display, then this may be the option for you.
How to use Screenshot toolbar function of your iMac or Macbook
- Press the hotkey combination Command + Shift + 5.
- On the toolbar that will appear at the bottom of your screen, choose the settings for your recording: "Record Entire Screen" or "Record Selected Portion". Once you select the parameters, move your mouse away from the toolbar and click anywhere on the screen to initiate screen recording.
- With the "Options" menu, you can select the desired location for your file to be saved after recording as well as set the "Timer", and more.
- To end the recording, press the stop button on the top menu toolbar or hit the Control + Command + Esc combination.
- Then, click on the preview window at the bottom right corner. Click "Done" to save the recording.
.webp)
Pros:
- Hotkeys use. You're able to screen record your Mac activities with a few simple hotkey combinations.
- Preview is available. Before you save your video, you can review it first to make sure the content looks the way you want it to be.
- No app used. To use this video recording method, you don't need any software or online service.
Cons:
- Limited customization settings. Only two modes for recording your screen: an entire display or a window.
- No editing capabilities. This is a screen recording tool only, so no option for quick trimming or cropping of the video.
3. OBS Studio
If you need to record the screen on a Mac computer and a little bit more, look no further than OBS Studio. This free open-source software can be used to capture video, audio, and even live stream your screen recordings.
How to screen record on Mac with OBS Studio
- Download and install the program on your computer.
- Click the "+" in the "Sources" field and add your web camera, microphone, and other media input devices.
- Hit "Start Recording" once all the settings are chosen.
- Once you're finished, click the "Stop Recording" button. Your screen capture video will be saved to your computer.
%20(1).webp)
Pros:
- Free but professional. This screen recorder is an open-source program but offers a professional full-featured toolkit.
- Customizable output settings. You can pick what format to export your video in, its resolution, and some other settings, such as frame rate and bit rate.
- Live stream feature. With this app, you can broadcast your video live and record it at the same time.
- No watermark or time limits. Unlike some free tools, OBS places no restrictions on the length or adds watermarks.
Cons:
- Too complicated for newbies. Not-experienced users may find using the software overwhelming due to its complexity.
- Learning curse. For the best results, you will have to learn all the capabilities of the video recording software first.
4. Vimeo
Vimeo is a popular video hosting website that offers a screen recorder as one of its features. Being web-based makes it a convenient all-in-one tool for producing educational and entertaining materials.
How to use Vimeo as a macOS screen recorder
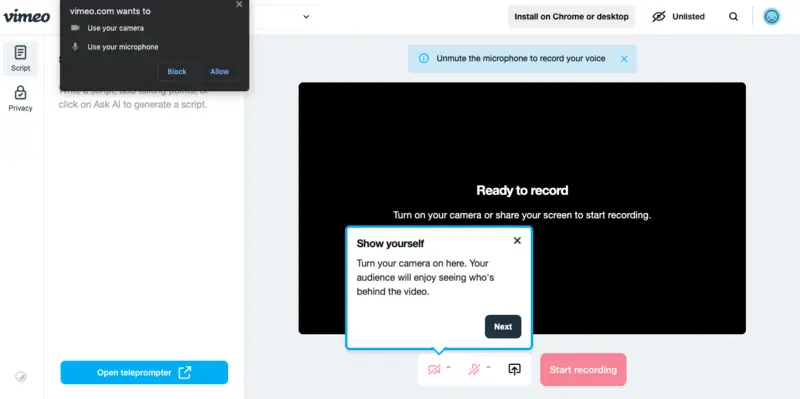
- Go to the web-based video recording tool.
- Hit the "Start for free" button to sign up for an account or login if you have one.
- In the top right corner, locate the "New Video" drop-down menu. There, select "Record screen".
- Give the platform access to your microphone and web camera. Hit the "Start Recording" button.
- After you record all you want, press "Stop Recording". The video will be stored in your Vimeo library.
- Share the video with your friends/students/audience or publish it to your Vimeo channel.
Pros:
- Tutorial for new users. When you begin to record your first video, the service will walk you through what each button means.
- AI script help. Add a script for your presentation or use the AI assistant to help you come up with the best accompanying words.
Cons:
- Limited free access. With the free account, you can only create 2 videos per month.
5. Vidyard
Vidyard is a video hosting and analytics platform primarily designed for businesses to leverage content for marketing, sales, and internal communications. It offers tools for producing, managing, and distributing screen-recorded materials, as well as tracks performance and viewer engagement.
How to record screen on Mac with Vidyard
- Go to the official website and sign up for an account.
- Log into your profile and fill in the required personal info to get started.
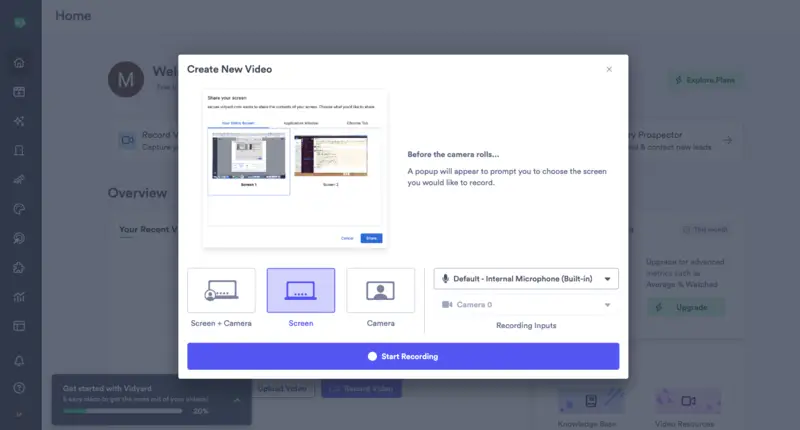
- Hit the "Record Video" button. Select the input sources and click "Start Recording".
- Choose the area to capture and continue with the "Share" button.
- To end the recording, press the stop icon.
Pros:
- Advanced analytics. The platform provides detailed insights into video performance, allowing businesses to fine-tune their strategies for better results.
- Integration capabilities. The screen recorder integrates seamlessly with many CRM, marketing automation, and sales enablement platforms such as Salesforce, HubSpot, and Marketo.
- Versatile sharing options. Videos can be easily shared on various social media like TikTok, via email, or embedded on websites, expanding the reach and impact of the content.
Cons:
- Learning curve. While the basic features are user-friendly, some of the more advanced functionalities might require additional training.
- Price. Depending on the plan, bandwidth and storage costs can add up, particularly for businesses with a large volume of video content.
6. QuickTime Player
QuickTime Player is a versatile media player for macOS, which also serves as an outstanding method to capture your screen. It's easy to use, and you don't have to worry about installation - it's already on your computer.
How to screen record on Mac with QuickTime Player
- Launch the app.
- In the "File" menu, select "New Screen Recording".
- Click the red record button in the pop-up menu that appears. Select the area of your screen you want to record.
- After completion, click the stop button in the menu bar at the top of your screen or press Command + Control + Esc on your keyboard.
- Your recording will be opened in the QuickTime Player window. From there, you can save it to your computer or share it with others.
.webp)
Pros:
- Built-in video recording tool. Comes free as it's one of your default apps from Apple.
- Quality. Records in high quality due to greater compatibility with the macOS.
Cons:
- Not for games. Not suitable for recording games as it cannot capture them in real-time (60 FPS).
- No video editing options. You'll have to use other software if you need to trim certain parts of the video or make other changes.
7. Loom
Loom is an online screen recording platform designed specifically for creating educational videos. It allows you to quickly capture and share video recordings of your screen and webcam. It's an ideal method for crafting tutorials, software features, and displaying presentations.
How to screen record video on macOS in Loom
- Go to the website and sign up for an account if you don't have one already.
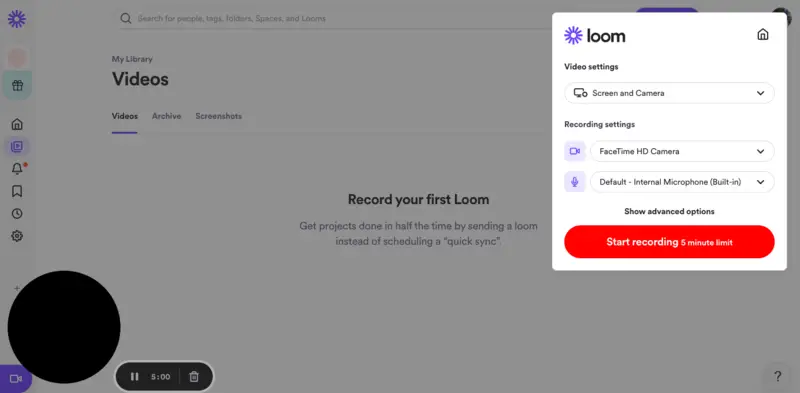
- In the main tab, click "New Video" and choose "Record a Video".
- Allow the program to have permission to use your webcam if you need to record yourself too. When ready, click "Start recording".
- To finish the recording, hit the red stop icon or use the hotkey combination Command + Shift + L.
- Now you can access and share your video from your Loom profile.
Pros:
- Subtitles. There is a specific feature to add subtitles to your recorded materials.
- Online storage. When signing in for an account, you get the online storage to share your videos from.
- Statistical insights. You can see who viewed your videos and for how long, useful for tracking engagement.
Cons:
- Limitations apply. With the free version, you can only store 25 videos up to 5 minutes long, and can't download them (only share).
8. Zoom
Zoom is a popular video conferencing platform that allows users to conduct virtual meetings or webinars. It offers screen sharing. Users can use the feature of breakout rooms to facilitate seamless communication and productivity.
While the meeting can be recorded, there is also a way to create pre-recorded materials with the Clips option.
How to record screen on Mac with Zoom service
- Visit the main page of the website and create a free account. Install the Zoom app on your computer.
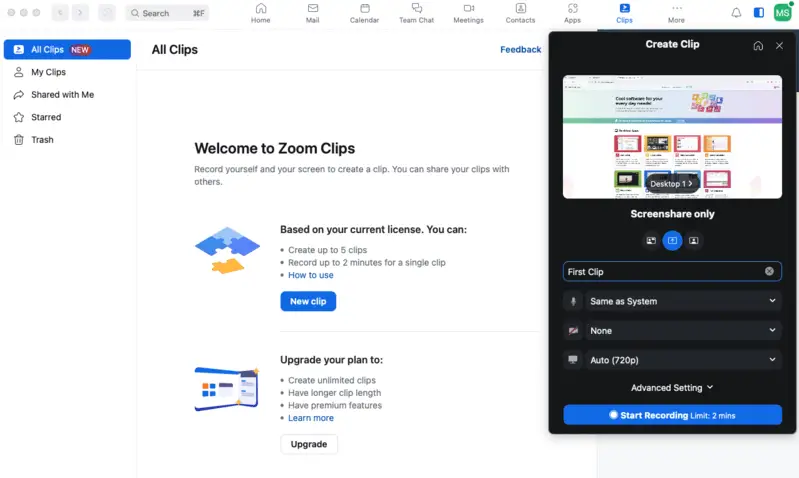
- Go to the "Clips" tab and hit the "New clip" button. Click "Launch Zoom". You will be redirected to the desktop version from the web.
- Follow the hints of the program to enable access to your screen, web camera, and microphone.
- Press "New clip" again to record a video. Enter the clip name, and set your input sources (camera, microphone, etc). When ready, click "Start Recording".
- During the recording you can mute or pause the video. If you need to start the recording all over again without saving the result, use the "Cancel" option.
- To end the capture, press "Finish".
Pros:
- Integrated functionality. After recording the screen, users can trim, and share the video directly within the Zoom platform, so it's convenient for creating and distributing content without any additional software.
Cons:
- Limitations. With the free account, users are only able to record and store 5 videos of 2 minutes in duration each.
s-cons> -->
s-cons> -->
9. ScreenFlow
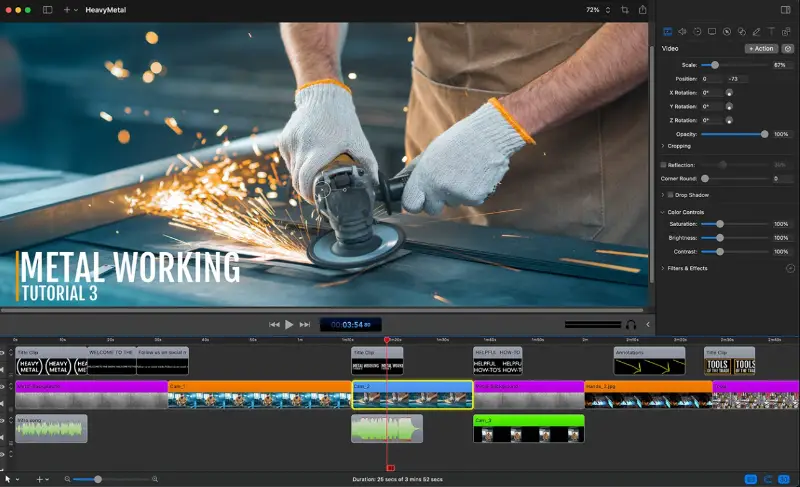
If you want a powerful screen recording tool with easy-to-use editing features, ScreenFlow is a great choice. This paid software combines capturing with a built-in video editor, making it perfect for creating polished tutorials and presentations.
How to record your screen on Mac with ScreenFlow
- Download and install the program on your computer.
- Open the app and click "New Recording".
- Select the screen or window, and configure audio inputs such as your microphone or system.
- Hit the red "Record" button to start the process.
- When finished, press "Stop Recording" or use the menu bar icon.
- Edit your clip, then export it to your preferred format.
Pros:
- All-in-one solution. Combines screen recording and video editing in one user-friendly application.
- High-quality output. Supports 4K resolution and exports in multiple formats.
- Powerful editing tools. Includes annotations, transitions, callouts, and multi-track timeline.
Cons:
- Paid software. Requires a license purchase; no free version is available.
- Resource-intensive. Can use significant system resources.
Choosing the right resolution and frame rate
- 1080p (1920x1080) – Best for most cases, offering a balance between quality and size.
- 1440p (2560x1440) or 4K (3840x2160) – Ideal for high-quality tutorials but results in larger files.
- 720p (1280x720) – Suitable for smaller file sizes, but not recommended for detailed content.
- 30 FPS (frames per second) – Standard for most presentations and general screen recordings.
- 60 FPS – Useful for smooth playback, especially if you’re capturing software demonstrations, fast animations, or gameplay.
More tips for creating high-quality screen recordings
- Turn off unnecessary apps, notifications, and other distractions that might appear during your recording. This will help your audience focus on the content you're presenting.
- External microphones generally offer better sound quality compared to built-in laptop ones. Consider using a pop filter or windshield to reduce background noise.
- Some tools allow for basic video editing, like adding annotations, text, or zooming in on specific areas.
- For video recording that involves live streaming or video conferencing (e.g., Zoom or Loom), ensure your internet connection is fast and stable to prevent lagging, buffering, or poor quality.
Conclusion
Screen recording can be a great way to create video tutorials, capture gameplay, or document other activities on your Mac.
Understanding the right way to execute it can help you get the most out of your recordings. By following these steps, you can create quality screen recordings that are sure to impress!
FAQ
- Can I record audio with a Mac screen recording program?
- Yes, you can record audio while screen recording on a Mac. To do this, make sure you allow the program or service you use to access your microphone.
- How can I edit my screen captures on a Mac?
- Some screen recorders discussed offer integrated video editing features. If the tool you choose doesn't have such capability, you can use any video editor to alter your recording.
- Can I highlight mouse clicks in my recordings?
- Yes, if the recorder you use has such functionality. For example, QuickTime Player allows you to do this.
- Can I add audio to my screen recordings?
- Yes, you can easily add background music or voiceover to your recording after you save it to your device. Any video editing software will help you do that.
- Can I record the webcam while recording my screen?
- Yes, all of the above-mentioned macOS screen recorders permit you to simultaneously record both your screen and webcam video.
- For how long can I record my screen on Mac?
- This will depend on what app or service you are using and how much storage space is available on your device.
- What if I wish to record my iPhone/iPad screen?
- Most of the mentioned above methods will work on your iPhone or iPad. However, each device also has specific apps for screen recording.

.webp)

