How to Trim a Video on Windows PC
It often happens that the videos we film turn out to be longer than necessary. The best option is to trim the video using some kind of video editing software.
Trimming is especially useful for removing long pauses, irrelevant content, or any other unwanted parts from a video. It helps improve the overall quality by getting rid of distracting elements that don't serve any purpose.
To make the most out of your clip, you need to choose a reliable and easy-to-use video trimmer for Windows OS. In this article, we describe 5 ways how to cut video files with just a few clicks.
Video trimmers: summary table
| Program | OS | Other features | Rating |
|---|---|---|---|
| Icecream Video Editor |
Windows
|
Cutting, trimming, merging, adding text, transitions, and applying filters.
|
5.0 |
| Photos |
Windows
|
Adding text, applying filters, and creating simple projects.
|
4.4 |
| VLC Media Player |
Windows
MacOS
Linux
iOS
Android
|
Basic editing and conversion features.
|
4.2 |
| Shotcut |
Windows
MacOS
Linux
|
Multi-track editing, video effects, transitions, and support for various formats and resolutions.
|
4.0 |
| Video Candy |
Online
|
Editing, compression, merging, cropping, resizing, and more.
|
4.0 |

How we picked video trimmers
In the article, we are covering 5 video-trimming apps. All of them are free, offer basic tools, and are suitable for use by inexperienced users.
All video cutters work on Windows computers.
Trimming video files is a simple process that allows you to quickly edit your existing videos and make them more appealing to viewers. Splitting and cropping may also be essential depending on your needs, but trimming is easier and faster for most basic editing tasks.
Icecream Video Editor
Icecream Video Editor is a great video editing software for Windows that lets you cut out unwanted parts of video files with ease.
How to shorten a video with Icecream Video Editor
- Download video editing software. Launch the program.
- Add the file(s) into the Media Library (drag and drop it or press "+Add files").
- Move the file(s) to the timeline. Hit on the clip on the timeline to select it. Then tap the "Trim video" button above the timeline area to enter the corresponding mode.
- Use the yellow markers with the timers on top to specify the new start and finish times of the video. Press the "Done" button when finished to return to the main window.
- Click the "Export video" button in the top-right corner to proceed with saving the file.
When exporting the project, you can enter the new filename, select the folder to save the video in and specify the output format, resolution, and quality. When the file is ready, a pop-up window will appear suggesting to open the containing folder or upload the video to YouTube, Google Drive, and Dropbox.
Note: It is possible to preview the result in the player before you actually cut the files. Click the "Play" button to launch the playback.
Windows users will benefit from utilizing this editor as a video cutter for several reasons. It has a variety of other tools that can enhance your video production.
The toolkit includes merging, reversing, cropping, adding background music, muting videos, and much more. The video trimmer supports all popular formats, such as MP4, AVI, WebM, MOV, and others.
Photos
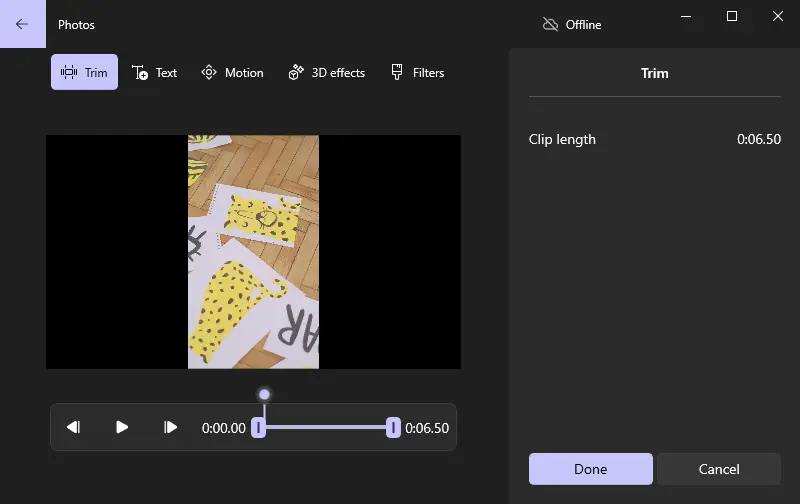
The video trim tool can assist you in removing any undesired parts and enhance the appearance of the clip. The Photos app is designed to be intuitive and user-friendly, enabling you to quickly and easily edit videos on a Windows computer.
How to cut a video using Photos
- Launch the Photos application.
- Select the desired clip for video trimming from a folder on your device.
- Click "Trim Video" in the upper-left corner of the screen. The timeline will pop up. Use markers to indicate where you want to start and finish trimming.
- Tap "Save a copy" to get the edited video as a new file. Or hit "Replace" to swap your existing video with the shortened version.
- Lastly, rename the video and press "Save".

Employing this program as a free video cutter is convenient for Windows users, especially for those with no editing experience. However, it has only basic trimming tools, so it may not meet all of the needs for more extensive video production.
Hence, if you need to make more changes to your video, like adding background music, you'd better try a different program.
VLC Media Player
This is an open-source player that provides users with free tools to edit clips. It offers primitive features to cut, crop, merge clips, as well as shorten video.
How to trim videos on Windows in VLC
- Open the file in the program.
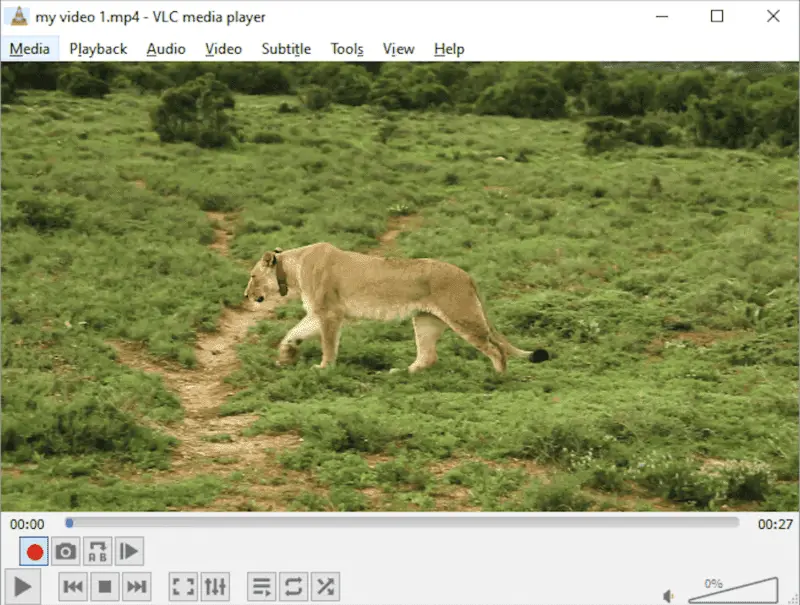
- Click on "View" from the menu bar and select "Advanced Controls".
- The advanced controls will appear.
- Set the start point and press "Play" and "Record" afterwards.
- To save the file tap "Stop".

The interface of the program is not intuitive, which may take time for many users to get used to it. People report that the app may crash if you try to edit large files or if your computer's hardware is not powerful enough.
Additionally, some clips may not be compatible with the application due to its limited file format support (the Apple-developed software is best for playing and editing MOV videos).
Shotcut
Shotcut is a free, open-source video editing software that offers a rich set of features, making it ideal for both novice and experienced users.
How to trim a video clip using Shotcut
- Download the application from the official website.
- Launch it and click "Open File" to load your video.
- Drag the clip to the timeline.
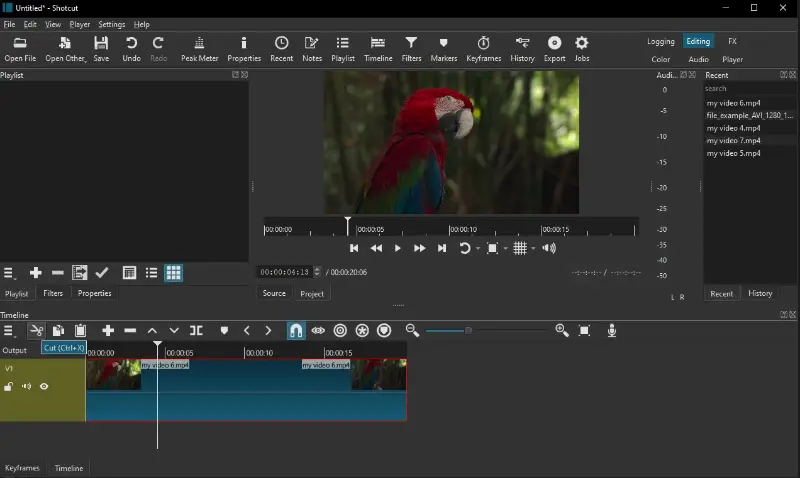
- Use the playhead and the "Cut" tool (scissors icon) to trim the video at the desired start and end points.
- Press "Export" in the top menu, choose the preset, and hit "Export File" to save the resulting video.

This program is available for Windows, macOS, and Linux, making it accessible no matter which operating system you prefer.
Thanks to FFmpeg integration, this video cutter supports a vast array of formats without the need for additional plugins. However, the app requires a powerful computer for smooth operation, especially with complex projects.
Video Candy
Video Candy is a free online tool that allows users to trim videos quickly and easily without downloading any software.
How to trim a video with Video Candy
- Go to the Video Candy website.
- Select the "Trim video" tool from the homepage.
- Upload your clip by clicking Add File or dragging it into the area.
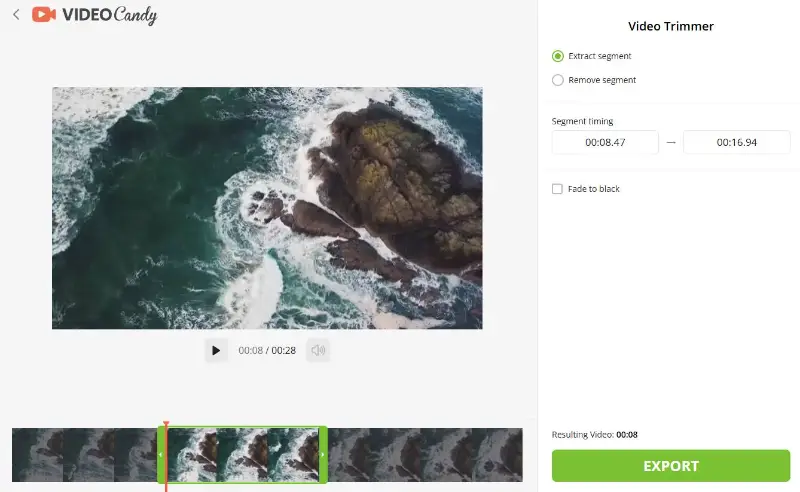
- Use the sliders or input the start and end times manually to choose the part you want to keep.
- Click the "Export" button to process your video and download the result.

The online interface is very user-friendly, making it a great choice for quick video trimming without complicated settings. However, uploading large files depends on your internet speed.
Split vs crop vs trim
Some users may confuse these three video editing tools. Below is an explanation of how to distinguish them from one another.
| Tool | Description | What's used for |
|---|---|---|
| Trimming | A process to shorten existing videos by removing unwanted content. | Usually, this is the preparatory step for collecting clips for further merging. |
| Splitting | Dividing the video into two or more parts. | It's often used for creating separate clips from one larger source. Most often, both parts of the split video are preserved in the final production. |
| Cropping | Zooming in on a certain part of the video. | To crop a video means to cut a video's edges if they have an unnecessary distractive background or content. |
Trimming doesn't involve separating the video or zooming in on any specific part. Instead, it simply eliminates a portion of the video from beginning to end. With video trimmer software, you can remove unnecessary footage without affecting the rest of the clip.
FAQ on how to trim videos on Windows
- How do I trim large video files?
- You should use a powerful video editing suite. Icecream Video Editor is designed to handle big files efficiently and helps cut videos fast and easily.
- How do I know where to start and end my trimmed video?
- It's best to utilize the preview feature of the video cutter. Watch the clip and determine the beginning and end points. This will help you make sure that you keep only the parts of the clip that are necessary for your project.
- Can I trim videos in real time during a live stream?
- Trimming videos while live-streaming is generally not feasible due to technical challenges associated with altering content as it's being streamed. Live streams typically focus on broadcasting real-time events rather than editing existing content.
- What should I do if I accidentally trim too much from a video?
- If you cut too much from a video, you can try using the undo feature if available, revert to a previous version of the project, or re-edit the trimmed portion. Additionally, working with backup copies of your original video files can prevent permanent loss of footage.
- How does trimming affect the playback speed?
- Cutting a video does not directly affect its speed. However, if the trimmed sections include slow-motion or speed-up effects, you may notice changes in the pacing or rhythm.
Useful tips on using video trimmers
Whichever video cutter for Windows you choose, here is a list of general advice that will help you get the best result!
- Watch the clip through before you start so you know what content you want to leave and which parts should be cut out.
- Split a large file into numerous sections before you start to cut videos for easier navigation within content.
- Set the timeline to the length of the video you wish to trim, and then make adjustments if needed.
- Indicate special points in your videos, such as the start and end of the clip, to not miss any important details.
- Use the markers to keep track of what you have trimmed, and double-check your edits for accuracy.
- Check for audio sync after the trim is complete, and adjust accordingly if there are any issues.
- Be mindful of transitions when you are trimming, making sure that they are smooth and not jarring or abrupt.
- Save often as you are using the video trimmer so that you don't lose any progress if something goes wrong.
- Confirm your clips are the correct size for their intended purpose before you export them; some platforms require specific dimensions for optimal playback quality.
- Back up your work regularly and save it to an external storage device so that all your attempts don't get lost in case of a system crash or power failure.
- Preview the trimmed video before finalizing to ensure the cut sections flow naturally and the important content is intact.
- Use keyboard shortcuts if available to speed up the process and increase precision.
By knowing how to effectively cut videos, you can easily create high-quality content for your social media accounts, websites, and more. With the additional tools of a video editor, you can combine clip together, trim them, add music to make your videos stand out.
Conclusion
Now, you are equipped with three simple methods of how to cut a video's length on a Windows computer. In the end, video cutting is an excellent way to eliminate unnecessary footage and create a more succinct and intriguing clip. With just a bit of practice and patience, you can get used to the video trimmer to get the perfect clips for your project.
Co-authors


.webp)
(1).webp)
(1).webp)
(1).webp)
