How to Resize Pictures: 7 Ways
Knowing how to resize pictures is an essential skill if you're dealing with images on a regular basis.
Whether you're a professional graphic designer, a photographer or even just someone who wants to post photos online, it would be highly beneficial to understand how to resize a picture.
Are you interested in learning how to change the size of a picture? We will guide you through several methods that does not require any knowledge of photo editing software and image sizing principles. With these skills, you can easily customize images for any purpose.
Top picture resizers: summary table
| Application | Presets | Additional features | Proficiency level |
|---|---|---|---|
| Icecream Image Resizer |
Yes
|
Batch processing
Vertical images recognition
Photo compression
|
Beginner friendly
|
| Adobe Photoshop |
Yes
|
Batch processing
Resample option
|
For professional usage
|
| BeFunky |
No
|
Batch processing
Web application
|
Beginner friendly
|
| Adobe Express |
Yes
|
Batch processing
Cross-platform
|
Beginner friendly
|
| Photos app |
No
|
Choice of the quality
Built-in file conversion
|
Beginner friendly
|
| Paint |
No
|
No
|
Beginner friendly
|
| Fotosizer |
Yes
|
Effects
Metadata editing
Rotation
Quality slider
|
Beginner friendly
|

How we chose applications to resize pictures
When it comes to selecting the best methods for resizing pictures, we took into consideration several factors.
We evaluated the effectiveness, ease of use, and accessibility of each image resizer. Additionally, we considered the availability of additional options, as well as the level of technical knowledge required.
Ultimately, we chose the methods that are most straightforward and suitable for users with varying levels of experience.
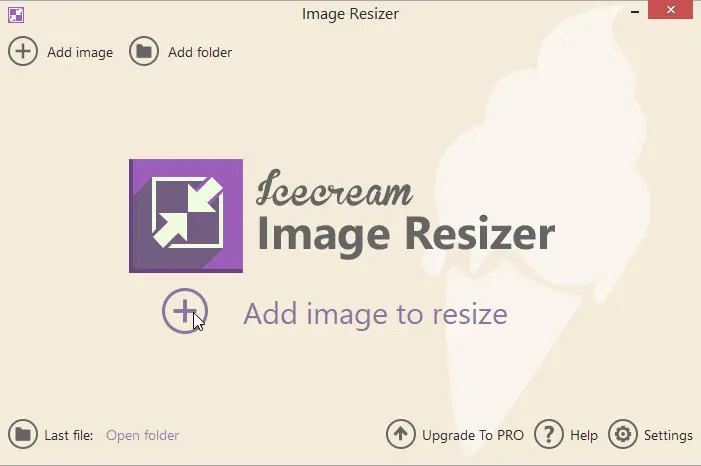
Method 1. Icecream Image Resizer
If you don't have the right tool to resize images, you'll find it difficult to make your photo fit properly on a website or to email large images.
Icecream Image Resizer was designed for this type of tasks and allows you to change the dimensions of pictures to make them suitable for your specific case.
How to resize any of your images with Icecream Image Resizer
- Download the picture resizer for Windows on your computer. Run the file and follow the wizard to complete the installation. Launch the program to start picture resizing.
- Use the "Add Image To Resize" button to load the needed images. Alternatively, if all the files are stored in the same folder, press the "Add Folder" button to import them all at once. And of course, you can simply drag and drop your photos to the main window.
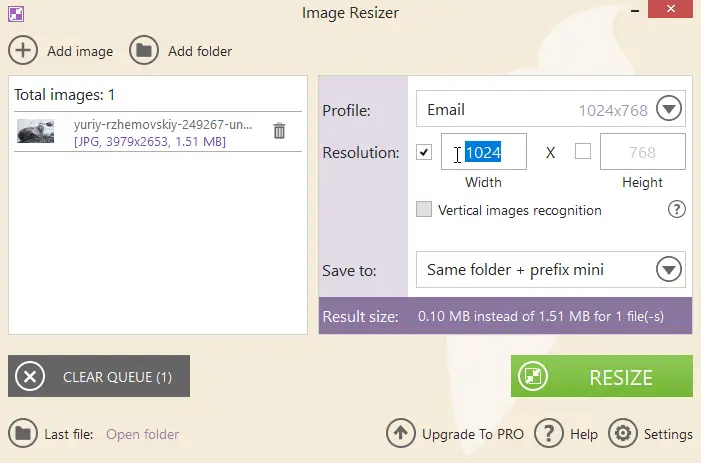
- Adjust the settings. See their description below.
- Press the "Resize" button to start the process.
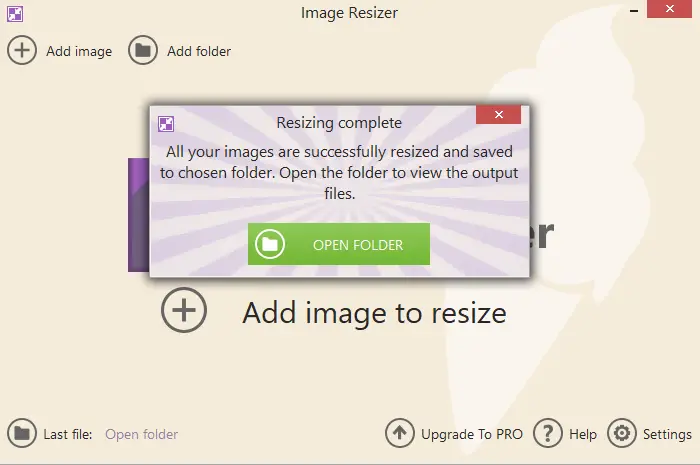
Note that you can stop, cancel, or resume the resizing at any moment.* On completion, you can open the containing folder as suggested by the program or close the application.
Customization options
The following steps will help you prepare your files for resizing:
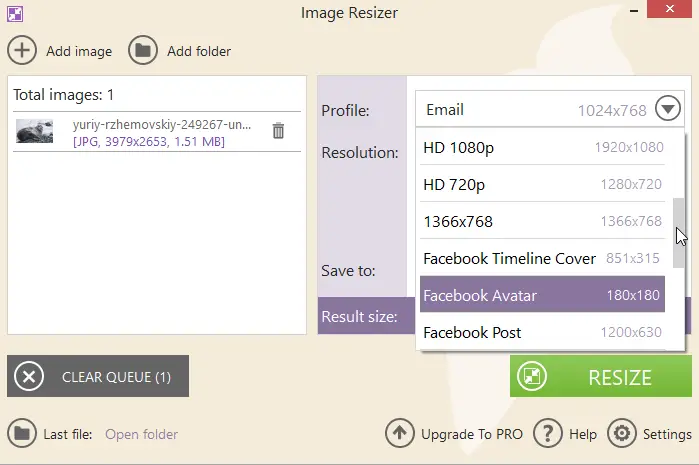
- Profile parameters. If you want to resize pictures for some specific task like using it as desktop wallpaper, you can choose a corresponding profile. If you need to set the parameters manually, you can choose the "Manual" option.
- Resolution. You would be allowed to type the desired "Width" and "Height" values. If you only want to change one of the values, uncheck one of the boxes. If you want to maintain the width-height ratio of the image unchanged, check the "Keep original aspect ratio". Don’t forget to check the "Vertical image recognition" box if you are working with a vertical image.
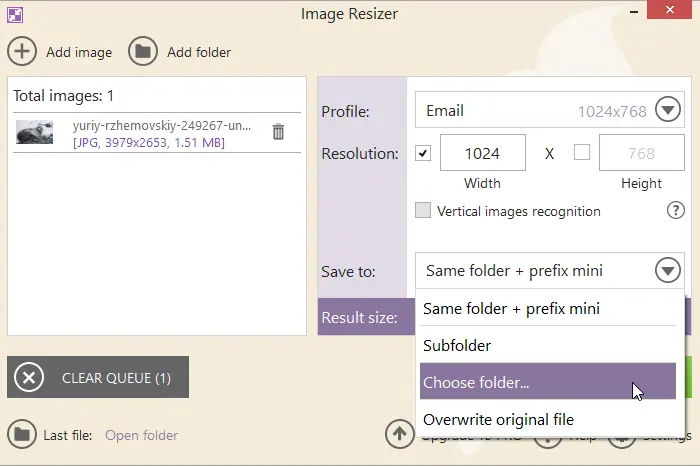
- Save to. Once all your settings are configured, make up your mind on the output location of the resized files.
Advantages
- 20+ pre-made profiles. Change photo dimensions to the size of the Facebook, Twitter and others avatar without any guesswork.
- Manual resolution adjustment. Enter any desired dimensions in pixels.
- Vertical image recognition. The values for the width and height of vertical images would be switched automatically.
- Result preview. Before downloading the image, you can see how the weight of the picture has changed.
- Batch processing. It is possible to upload and resize the whole folder of pictures at once.
Method 2. Adobe Photoshop
Adobe Photoshop is a powerful image editing software used by professionals and amateurs alike for creating, manipulating, and resizing photos. With knowledge of how to employ straightforward tools and commands, you can rapidly adjust the dimensions of pictures.
The instructions to change dimensions of the picture in Adobe Photoshop
- Install the resizing tool and open the image in it.
- Select the picture by tapping it once.
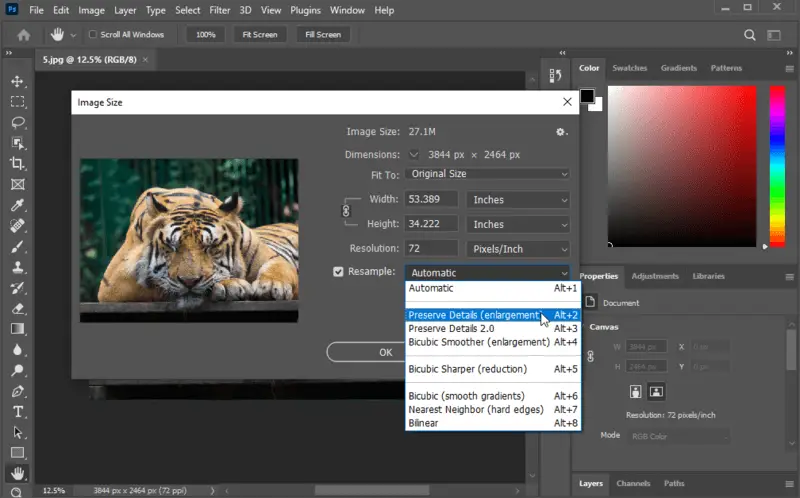
- Go to "Image" and then "Image Size". This will open up a dialogue box where you can adjust the picture size.
- Use the width and height fields to enter the desired measurements. The resolution field should remain unchanged as it determines how many pixels are used to create each inch of your picture.
- Make sure that the "Constrain Proportions" box is checked so that your photos keep their original shape as you resize them.
- Finally, click "OK" to apply your changes and save your photo.
Pros:
- Accuracy. With its powerful tools, you can easily change the size of a picture with extreme precision.
- Auto resolution. You can accept the default dimensions and load the new ones.
- Resample option. Decide whether you need to preserve details, apply bicubic smoother, gradients or hard edges.
- Extensive format compatibility. Supports a wide range of footage types.
Cons:
- Time-consuming. It requires a wider range of skills and more experience if you want to get the most out of it.
- Price. Image resizer ranks among one of the more expensive photo editing solutions mentioned in our article.
Method 3. BeFunky
BeFunky is a free online photo editor that simplifies the process of resizing photos. The user-friendly interface allows you to quickly change picture size without having to learn complicated photo editing techniques.
How to change image size online with BeFunky
- Open the website and pick the image you wish to resize.
- On the left side of your screen, find a box labeled "Edit". Click it.
- Find the option "Resize". Select it.
- Check "Lock aspect ratio" if needed. In the appropriate fields, enter the preferred size.
- Click "Apply" when you've entered all the information needed.

Pros:
- Online service. You do not have to install any software to resize your pictures - all you need is an Internet connection.
- Batch processing. You can apply selected dimensions to all pictures simultaneously.
- Integrated tools. Offers additional features such as cropping, filters, and effects alongside resizing.
Cons:
- Slow uploads. The upload speed can be quite slow depending on your connection.
- No adjustable settings. You will not be able to set the quality of your output and choose from several preset sizes.
Method 4. Adobe Express
Adobe Express serves as a web-based application designed to help you quickly and easily resize your photos. The service has a simple and user-friendly interface, allowing you to quickly select the image size and quality you need.
How to resize an image online with Adobe Express
- Go to the Adobe Express's picture resizer and browse the photo you aim to change in size.
- Select the "Resize" option from the top toolbar.
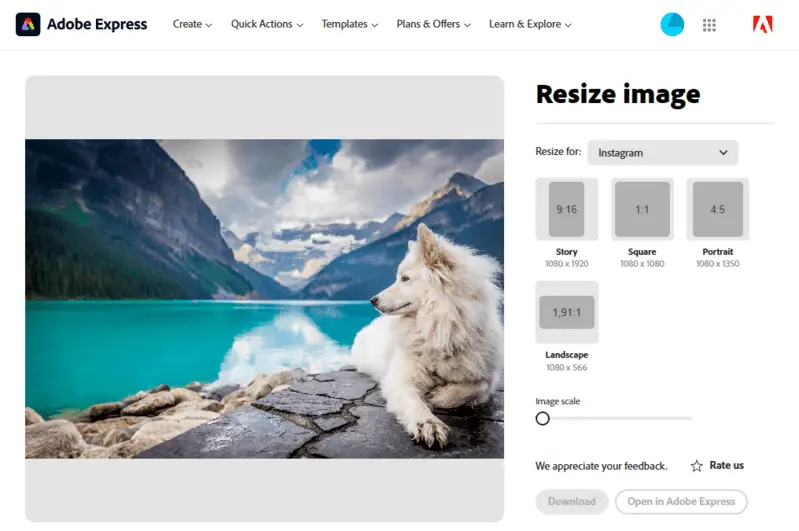
- Enter the new size for your image in pixels, or choose the preset measurements.
- Use the "Lock aspect" to make sure your resized image will retain its original shape proportions.
- Once you are satisfied with your settings, press the "Download" button.
Pros:
- Image scale. Drag the slider and the photo itself to scale it.
- Preserves the quality. Images won't be distorted or pixelated after using image resizer.
- Compatible with multiple platforms. Works on both Windows and Mac computers, as well as on mobile devices.
Cons:
- Lags in the application. Users report that the resulting photos are sometimes disproportionate.
- Format support. Not compatible with less common formats like SVG.
- Mobile functionality. Although it is possible to change the size of a picture on portable devices, the mobile version is not as powerful.
Method 5. Photos app
The Photos app is an easy-to-use tool providing speedy and convenient picture resizing. It's great for people who need a quick fix for their photos. In addition, it is pre-installed on the PC with Windows 10 and 11.
How to resize pictures in Photos app
- Open the picture in the Photos app.
- Click three dots in the size changer and choose "Resize image" from the drop-down menu.
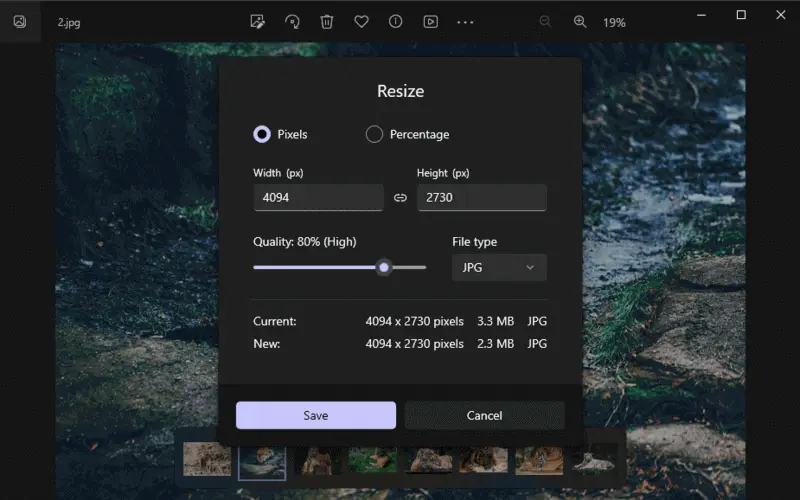
- Select how you wish to resize the photo: in pixels or in percentage. You can select a custom size and enter your own dimensions.
- Adjust the other settings and press "Save".
- The picture will promptly be adjusted to your preferred measurements.
Pros:
- Intuitive interface. An easy-to-use picture resizer, so you don't have to be an expert to adjust your photo's size.
- Variety of options. The tool provides such customization options, as choosing quality and file type of the output picture.
Cons:
- Compatibility issues. The app isn't compatible with all image formats, so you may find yourself stuck if you're in need to resize an unsupported file type.
- No before-and-after view. You cannot visually tell how much resizing will change how the photo looks.
- Has no presets. You need to know the exact dimension requirements of the social network or blog to enter them manually.
- No batch processing. If you want to resize multiple images, you must do it one by one.
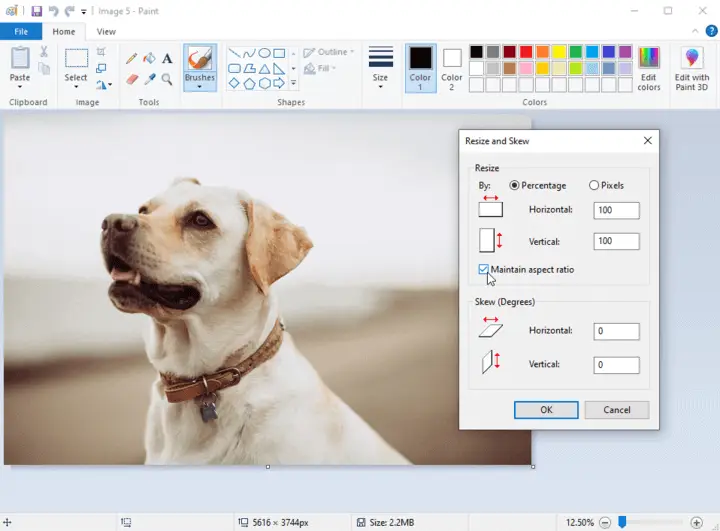
Method 6. Paint
Paint is a free image editing program included with Microsoft Windows. It facilitates adding text to images, cropping, and resizing pictures.
How to use Paint to change picture size
- Access the image you desire to resize in the application.
- Select the "Resize" button from the "Home" tab.
- You'll see two options: "Percentage" and "Pixels".
- Choose one option depending on your needs, then input the measurements for the image.
- Finally, click on the "OK" button to implement your modifications and store the new version of your picture.
Pros:
- No fees, subscriptions, or downloads. It's a free picture resizer readily available on Windows computers.
- Maintain aspect ratio option. You can decide whether to keep the images' original aspect ratio or not. This will determine if your picture will be squashed or stretched when resizing it.
Cons:
- Quality loss. Quality can degrade when resizing images significantly.
- Limited customization. You have no control over the final output size and appearance of the image.
Method 7. Fotosizer
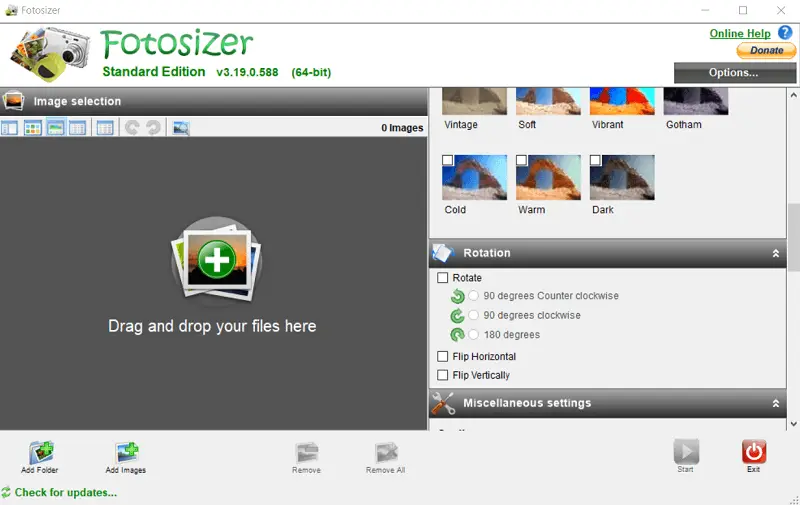
Fotosizer excels in efficient batch processing of footage, handling diverse formats such as JPEG, PNG, BMP, and TIFF. It automatically adjusts orientation based on metadata and enables batch renaming with flexible patterns during the workflow.
How to use image size changer
- Open the software and click "Add Images" to choose the file you want to transform.
- Adjust the settings: either specify new dimensions in pixels, set a scaling percentage, pick a preset, select effects and more.
- Hit the "Start" button to begin processing.
Pros:
- Includes rotation. Permits turning images to desired orientations during edits.
- Optimizes PNG. Shrinks file sizes effectively while maintaining clarity.
- Modifies file timestamps. Updates metadata related to creation or modification dates.
Cons:
- No support for raw formats. Cannot directly handle unprocessed camera files.
- Restricted to Windows. Incompatible with other operating systems like macOS or Linux.
What is image resolution?
Understanding image resolution is essential for resizing pictures effectively.
Resolution refers to the level of detail that an image holds, typically measured in pixels per inch (PPI) or dots per inch (DPI). It determines the clarity and quality of a picture when it's printed or displayed digitally.
- When resizing images for print, DPI plays a crucial role. Printers use DPI to determine the quality of the printed image. The standard DPI for printing is typically 300, although this can vary depending on the printer and the desired quality.
- For images displayed on screens, such as those on websites or social media, PPI is more relevant. Higher PPI ensures that the image appears sharp and clear on high-resolution screens.
Resizing an image can be done either by adding or removing pixels (interpolation).
When enlarging, interpolation algorithms add pixels to fill in the gaps, which can lead to a loss of sharpness and detail. Conversely, when reducing an image's size, pixels may be discarded, potentially losing some detail.
Here is a table explaining common image resolutions and their corresponding characteristics:
| Resolution (Pixels) | Purpose/Use | Common File Types | Aspect Ratio | Recommended Use |
|---|---|---|---|---|
| 640x480 | Standard Definition (SD) | JPEG, PNG, BMP | 4:3 | Basic web graphics, small images |
| 1280x720 (HD) | High Definition (HD) | JPEG, PNG, MP4, MOV | 16:9 | Streaming, video content, web use |
| 1920x1080 (Full HD) | Full High Definition (FHD) | JPEG, PNG, MP4, MOV | 16:9 | High-quality video, movies, gaming, web |
| 2560x1440 (2K) | Quad HD (QHD) | JPEG, PNG, MP4, MOV | 16:9 | Gaming, high-quality video, professional monitors |
| 3840x2160 (4K UHD) | Ultra High Definition (UHD) | JPEG, PNG, MP4, MOV | 16:9 | High-end videos, TVs, professional production |
| 7680x4320 (8K UHD) | Super High Definition (8K) | JPEG, PNG, MP4, MOV | 16:9 | Cutting-edge video, photography, professional media |
| 300x200 | Small Thumbnail | JPEG, PNG | 3:2 | Web thumbnails, previews |
| 1200x800 | Small Web Image | JPEG, PNG | 3:2 | Web images, small banners |
| 2400x1600 | Medium Web Image | JPEG, PNG | 3:2 | Web and printed images, blog posts |
| 6000x4000 | Large High-Quality Print | JPEG, TIFF, PNG | 3:2 | Photography, print quality images |
| 10240x7680 | Large Print Poster | TIFF, PNG, JPEG | 4:3 | Professional posters, high-resolution prints |
| 4096x2160 (DCI 4K) | Digital Cinema Initiatives 4K | JPEG, PNG, MP4, MOV | 17:9 | Cinema production |
Social media image resolution
Choosing the right picture dimensions for social media is crucial for ensuring your content looks sharp while loading efficiently.
Recommended picture sizes for popular platforms:
- Instagram:
- Posts: 1080 x 1080 px (square)
- Stories: 1080 x 1920 px (vertical)
- Reels: 1080 x 1920 px (vertical)
- Facebook:
- Posts: 1200 x 630 px (landscape)
- Cover photo: 820 x 312 px
- Profile picture: 170 x 170 px
- X:
- Tweets: 1200 x 675 px
- Header photo: 1500 x 500 px
- Profile picture: 400 x 400 px
- LinkedIn:
- Posts: 1200 x 627 px
- Cover photo: 1584 x 396 px
- Profile picture: 400 x 400 px
- Pinterest:
- Pins: 1000 x 1500 px (portrait)
- Board cover: 222 x 150 px
- YouTube:
- Thumbnail: 1280 x 720 px
- Channel banner: 2560 x 1440 px
In general, 72 dpi is sufficient for web. Always ensure the aspect ratio fits each platform's guidelines to avoid distortion.
FAQ about resizing pictures
- Does resizing affect image quality?
- Resizing an image often involves lessening its dimensions by decreasing the number of pixels it contains. This can cause a noticeable decrease in quality if the image is being stretched or enlarged too much.
- How to avoid losing quality when resizing?
- The best way is by resizing photos as little as possible. Try using software that includes anti-aliasing features to smooth out edges and reduce jagged lines. It is vital to maintain the aspect ratio of your image so it doesn't appear distorted or stretched.
- What is the aspect ratio of an image?
- Aspect ratio is the correlation between the measurement of width and height of an image. It's usually expressed as two numbers separated by a colon, such as 4:3 or 16:9. The first number of this ratio represents the width, and the second shows the height.
- Why it is important to keep the aspect ratio?
- That's because resizing pictures without preserving their aspect ratio can skew their proportions and cause them to look distorted.
- Why does the image resolution matter?
- It determines the clarity and crispness of an image and can make a big difference in how a picture looks. Images with increased resolution have more pixels, which means they are sharper and clearer. Low-resolution images tend to look grainy or fuzzy when viewed at a larger size, making them unsuitable for many uses.
- If I downscale an image, will the file size change?
- Yes, when you resize a picture, it is compressed to fit into a space that is smaller than its original size. This reduces the file size of the image, allowing it to be easily shared and stored. The more pixels or dots per inch (DPI), the bigger the file size will be as there is more information to store.
How to resize pictures: tips
- Crop the image. If you don't need to keep the entire image, consider cropping it to make the size of the picture smaller.
- Save in a different format. When resizing, export in an alternate form like JPG, PNG, or GIF so you don't overwrite the original image.
- Employ percentages. Use percentages when resizing images to make them easier to adjust later if necessary.
- Consider the size of the files. Be mindful of file sizes since larger files can take longer to upload or download from websites or email attachments.
- Batch processing. It allows you to quickly adjust the size of multiple images in one go, saving your time.
- Determine the required size. If the picture will be used on social media, check the recommended image size guidelines for each platform to ensure optimal resolution and clarity.
- Maintain balance. Adjust pixel dimensions carefully to prevent loss of sharpness.
Conclusion
In conclusion, resizing pictures is a simple process which can be accomplished with the necessary resources and knowledge. Establishing which file size and resolution to select, and which format to save in are important steps to consider.
By following our guide, you can customize your images and make them look their best. Modifying image size is a useful skill that can help you create better designs and visuals for any project.


