Add a Slideshow to a Website in 3 Steps
Knowing how to add a slideshow to your website is a great way to show its content. Whether you're a business owner wanting to show your products or a creative professional seeking to display your portfolio, a well-designed slideshow can elevate your web presence.
In this article, we will explore how you can create a stunning slideshow and integrate it into your website. Both novice users and experienced web developers will find the steps outlined here accessible and adaptable to their specific needs.
Why and when do you need a slideshow
Creating a slideshow for your website can be beneficial in different scenarios.

Some reasons why you might need to add a slideshow to a website:
- Visual engagement. Slideshows can engage your website visitors, grab their attention, and make your content more appealing.
- Showcasing content. They are great for showing a collection of images or videos, such as a portfolio of your work, your products, travel photos, or event highlights.
- Storytelling. You can make a slideshow to guide visitors through a sequence of content. This can be particularly useful for tutorials or step-by-step guides.
- Promotions. If you're running a business, you can use slideshows to demonstrate new arrivals or best-selling products, ensuring they get prominent visibility.
- Homepage enhancement. Making a slideshow for your homepage can provide a quick overview of what you offer.
- Improved navigation. Simplifies content handling, allowing to easily browse through multiple items without overwhelming the layout.
Step 1. Create a slideshow
Crafting a slideshow sets the foundation for an engaging visual experience on your website. Icecream Slideshow Maker provides a powerful and easy-to-use program that can help you make a captivating presentation with ease.
How to create a great slideshow for a website with Icecream Slideshow maker
- Download and install the free slideshow maker for Windows.
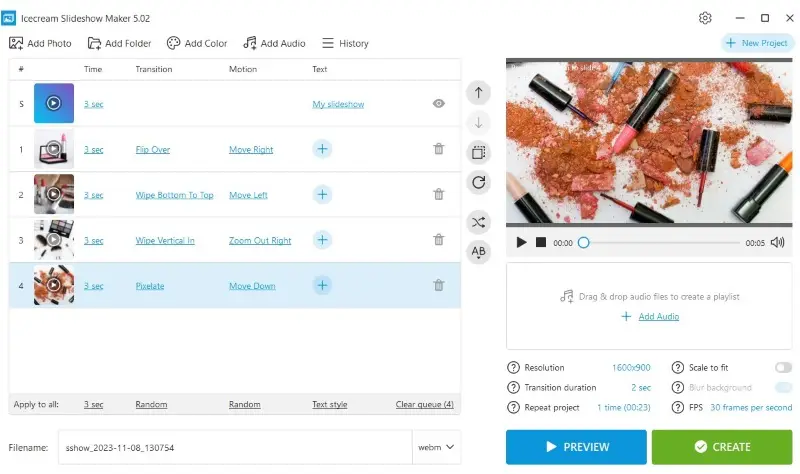
- Launch the program and click "Add Photo" or "Add Folder". You can also drag and drop the images you want to include directly to the program's window.
- Organize your images in the desired sequence.
- Customize each slide by adding captions, choosing the duration, and selecting transition effects between slides.
- Once you're satisfied with the result, press "Create". The slideshow will be saved to the device's storage.

Pros:
- Easy to use. The user-friendly interface of the slideshow maker makes it simple for anyone to create beautiful slideshows in no time.
- Fully customizable. You can personalize every aspect of your slideshow, from transitions and effects to fonts and colors.
- Audio integration. The software allows you to make a slideshow with music, enhancing the overall viewing experience.
- Preview. The slideshow creator has a preview function, allowing you to see how your slideshow will appear to viewers before finalizing it.
- High quality. You can create high-resolution slideshows, making them suitable for professional websites and sharing online.
- Commercial use. The slideshow maker has decent pricing for commercial users.
Step 2. Upload your slideshow
YouTube serves as an excellent platform for hosting and sharing your slideshow. Follow the steps below to upload the slideshow for a website.
If you've created a slideshow using Icecream Slideshow Maker:
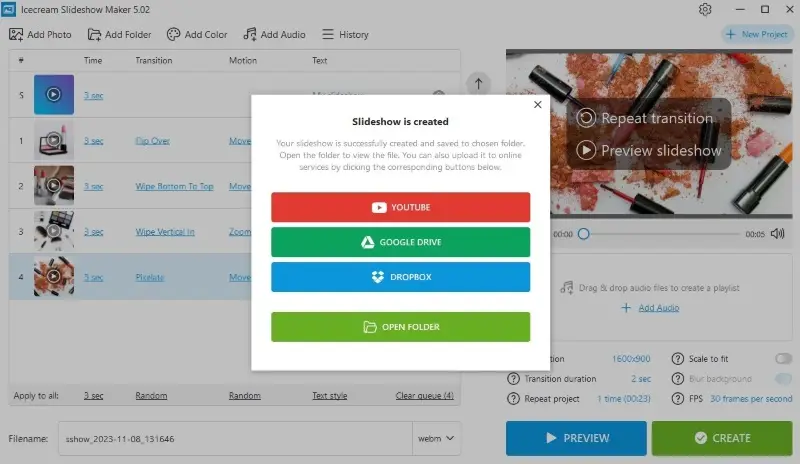
- After you've generated the presentation, a new window will be opened.
- Click the red "YouTube" button.
- Log in to your YouTube account. If you don't have one already, sign up.
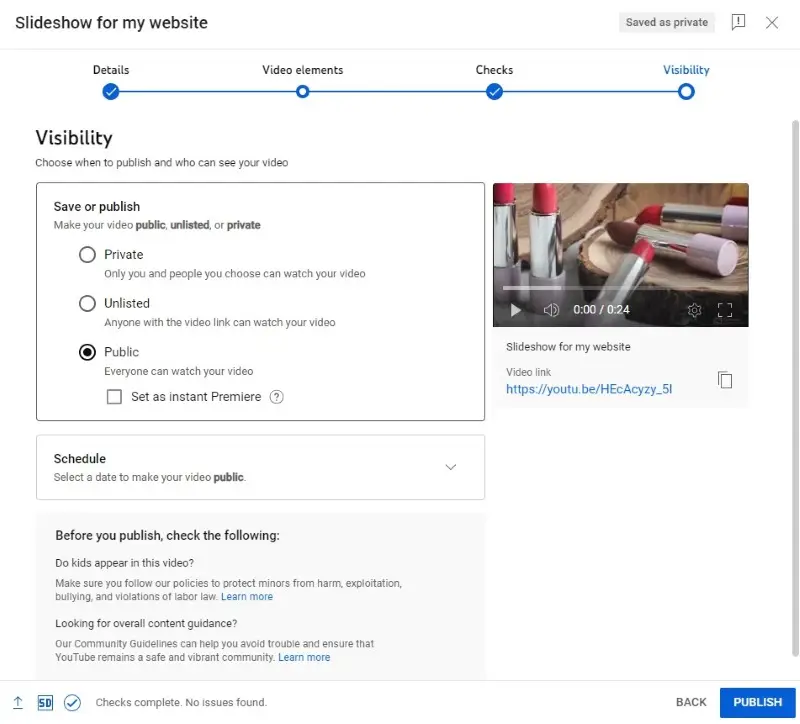
- Add relevant details like title, description, and tags.
- Select "Public" in privacy settings. Click "Publish".

If you already have a slideshow for your website:
- Go to YouTube and sign in using your Google account.
- Click on the camera icon located at the top right corner of the homepage.
- Navigate to the video file you want to upload on your computer and select it.
- On the upload page, you can add details about your video. Make sure to choose "Public" so anyone can view it.
- If you're ready to make your video public, press the "Publish" button.

Step 3. Add a slideshow to your website
First of all, you need to find the embed code for your slideshow.
Embed code is a piece of HTML code that allows you to insert external content, such as videos, audio, social media posts, interactive maps, or widgets, into a web page.
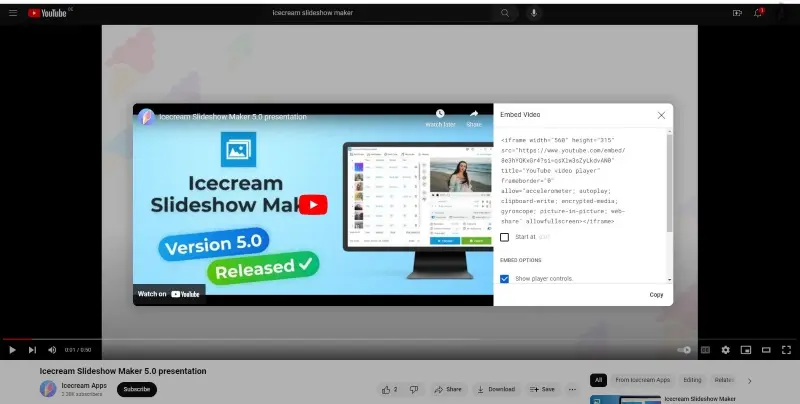
- Open the YouTube video.
- Click the "Share" button and then "Embed".
- Adjust the settings and copy the embed code.

HTML
- Go into edit mode for the page where you’d like to add your slideshow.
- Place your cursor in the desired spot of the code.
- Paste the embed code into the spot you found in your HTML.
- Save the edits.
Content management systems (CMS)
If you're using a CMS like WordPress, Joomla, or Drupal, there are plugins and modules available that allow you to easily add a slideshow to your website without needing to write any code.
Simply search for slideshow plugins compatible with your CMS and install them according to the provided instructions.
It is also possible to simply insert a URL code into the Visual editor. However, this method limits the control over the final result. That's why we recommend using the embed code.
Wix
- Click "Add" on the left pane of the screen and select "More".
- Add an "HTML iframe" and paste the code into the frame.
JavaScript
There are many JavaScript libraries available, such as Swiper.js, Slick.js, or Flickity, that offer pre-built slideshow components with various customization options. You can simply include the library in your webpage and follow their documentation to set up the slideshow.
What is an effective website slideshow?
Here are some key elements that contribute to a successful slideshow:
- Relevance. It should align closely with the website's purpose and audience, showcasing content that is pertinent and engaging.
- Visual excellence. High-quality videos or graphics are essential to captivate viewers. Clear, well-composed elements enhance the overall appeal.
- Consistency. A cohesive design and branding across slides create a polished and professional impression, reinforcing the identity.
- Clarity. Each slide should convey a distinct message concisely, balancing text with imagery to maintain viewer interest without overwhelming them.
- Smooth transitions. Transitions between slides should be seamless, adding to the viewing experience.
- Intuitive controls. Providing user-friendly navigation options empowers viewers to interact with the presentation at their pace.
- Accessibility. Making the slides accessible to all users, including those with disabilities, through features like alternative text and keyboard navigation is vital for inclusivity.
- Loading performance. Optimizing elements to ensure quick load times prevents frustration and reduces bounce rates.
Tips on how to add a slideshow to your website
- Preview before publishing. Before you publish a slideshow for your website, it's important to test it out first to make sure everything works correctly.
- Optimize for mobile devices. Ensure that your slideshow looks good on both desktop and mobile devices. Don't use icons that are too small the be correctly displayed on smaller screens.
- Make sure it loads quickly. Website slideshows can often take longer to load than regular pages. In case the loading process takes too long, try a video compressor to reduce the file size.
- Include captions. Make sure to include captions that explain what each slide is about.
- Auto-play. Consider adding an auto-play option as well as manual controls.
- Add controls. Employ indicators or thumbnails to give users a sense of the slideshow's progress and enable them to jump to specific slides if desired.
- Limit the number of slides. Avoid overcrowding by keeping the content concise, which helps maintain visitor interest.
FAQ
- How do I choose the right slideshow method for my website?
- Consider factors such as your technical expertise, design preferences, and the specific requirements of your website. If you're comfortable with coding, creating a slideshow with HTML/CSS might be the best option. If you prefer a quicker and easier solution, using a JavaScript library or a CMS plugin can be more suitable.
- How can I tune the slideshow to perform and load faster?
- To optimize performance, use appropriately sized images and minimize the use of complex animations or effects that could slow down loading times.
- Does adding slideshows to my site have any SEO considerations?
- Yes, ensure that each image in the slideshow has descriptive filenames and alt text that accurately describe the content of the picture. This helps search engines understand the context and can improve your website's ranking in search results.
- Are there any legal considerations regarding the use of images in the slideshow?
- Use pictures that you have made yourself, purchased from stock photo websites, or obtained permission from the original creator. Be aware of any licensing restrictions or attribution requirements, and always give proper credit when necessary.
- Can I add a slideshow to any type of website?
- Slideshow integration is possible on most types of websites, including blogs, business sites, portfolios, and e-commerce stores. The method of adding a slideshow will vary depending on the platform you're using.
Conclusion
Ultimately, adding a photo slideshow for a website can offer energy and visual appeal to the page. You now know how to create engaging slideshows that will capture your audience's attention and deliver your message effectively.
By following the steps outlined in this article, you can easily incorporate a slideshow into your website, be it through HTML or other means. Don't hesitate to explore the possibilities and make your website shine with the dynamic power of slideshows.


