4 Ways to Record Screen with Audio + Tips
In today’s digital age, capturing high-quality content is more important than ever. One key component to an engaging and effective video is the ability to record both the display and sound simultaneously. But how to record computer screen with audio?
In this guide, we'll walk you through the process of capturing your desktop with audio, providing you with the techniques you need to create professional-quality videos. We’ll cover the essential screen recording software options, step-by-step instructions for setup, and tips for optimizing footage quality.
Icecream Screen Recorder
Icecream Screen Recorder is a versatile video recorder designed for capturing both video and audio from your computer. It offers a range of features that cater to various needs, making it a popular choice among users who want to create tutorials, gameplay videos, or simply record meetings and presentations.
How to screen record with audio with Icecream Screen Recorder
- Go to the official website and download Windows screen recorder with audio.
- Follow the installation prompts to set up the screen recording software on your computer. Launch the program.
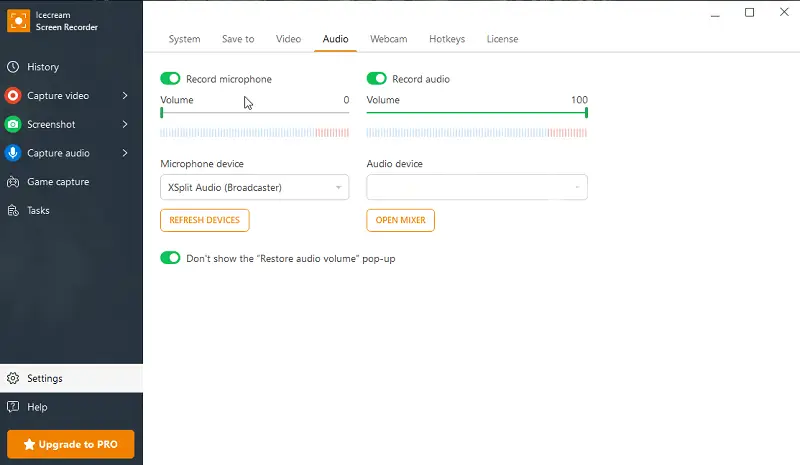
- Click "Settings" in the lower-left corner of the main interface. Ensure that the option for recording system audio is enabled.
- If you want to add voice commentary, turn on the "Record audio" option and select your microphone device.
- Hover your mouse over "Capture video" and choose one of the modes. You can drag the cursor to adjust the recording frame or pick to capture the entire screen.
- Hit the "Record" button to start screen recording with audio. If needed, you can pause or stop the process using the controls in the system tray.
- When you’ve finished, tap "Stop". The app will process and save your recording.

Key features:
- Recording Modes. Users can select a specific region of the desktop for video capture, whether it’s the full screen or just a portion of it.
- Multiple Output Formats. The desktop recorder allows you to save clips in popular formats such as MP4, AVI, WebM, and MOV.
- Editing Tools. After screen recording with audio, you can use the built-in tools to trim videos, adjust the speed, and change the resolution.
- Screenshot Capabilities. In addition to video capturing, the app also lets you take screenshots of your display.
- Annotation. You can draw, highlight, and insert text directly onto the screen in real-time as you record.
- Scheduled Recording. Set up desktop recordings to start automatically at a specific time. This is ideal for capturing live streams, webinars, or automated tasks without needing to be present.
- Hotkeys. Utilize customizable hotkeys to control functions quickly and efficiently. Start, pause, and stop recordings with keyboard shortcuts.
- Webcam Integration. Record video from your webcam along with your screen.
- Audio Input Control. Choose and adjust sources, including system sound and microphone, for clear audio capture.
OBS Studio
Open Broadcaster Software is a highly regarded, open-source screen recording software used for video recording and live streaming. Known for its extensive feature set, OBS is popular among content creators, gamers, and professionals who require robust, customizable streaming and recording solutions.
How to record desktop with audio in OBS Studio
- Download the software and install it on your computer. Open the application.
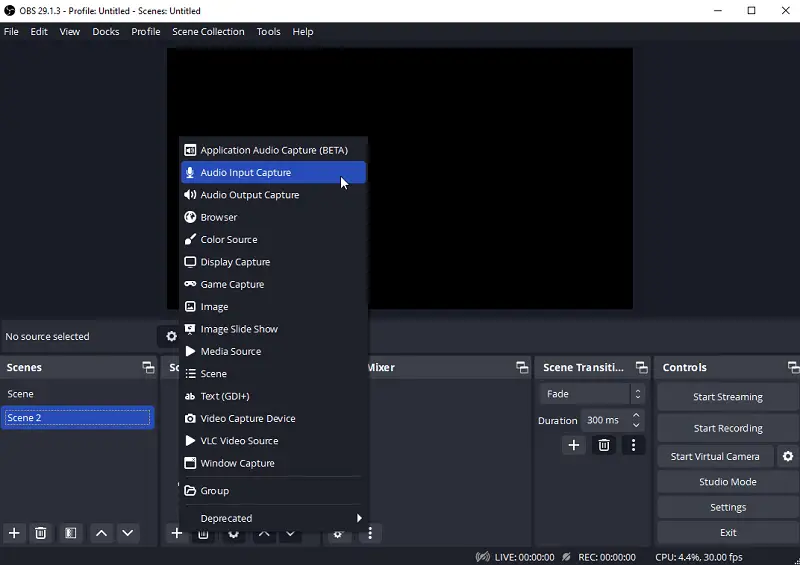
- In the "Sources" panel, click the "+" button, select "Display Capture", and pick the device you want to record.
- Press the "+" button again, choose "Audio Input Capture", and select the microphone.
- Tap the "Start Recording" button at the bottom right to begin screen recording on PC with audio.
- When you’re done, click "Stop Recording" in the controls. The video capture will be saved automatically to the specified folder.

Key features:
- Scene Management. Create and use multiple scenes with different layouts.
- Sound and Video Mixing. Fine-tune audio levels, apply filters, and manage footage transitions.
- Audio Controls. Optimize sound quality with features like noise suppression, gate, and gain control.
- Plugin and Extension Support. This can add new features, integrate with other services, and tailor the software to fit your specific needs.
- Stream to Social Platforms. Stream live to different services such as Twitch, YouTube, Facebook, and more.
- Studio Mode. Preview scenes and sources, allowing for smooth transitions and error correction.
Game Bar
The combination of audio and visual elements makes recording your computer screen an effective method for generating tutorials or documenting gameplay. Thankfully, having a Windows 10 and 11 computer grants you the ability to use the Game Bar, which has a built-in screen and audio recorder.
How to screen record with voice in XBox Game Bar
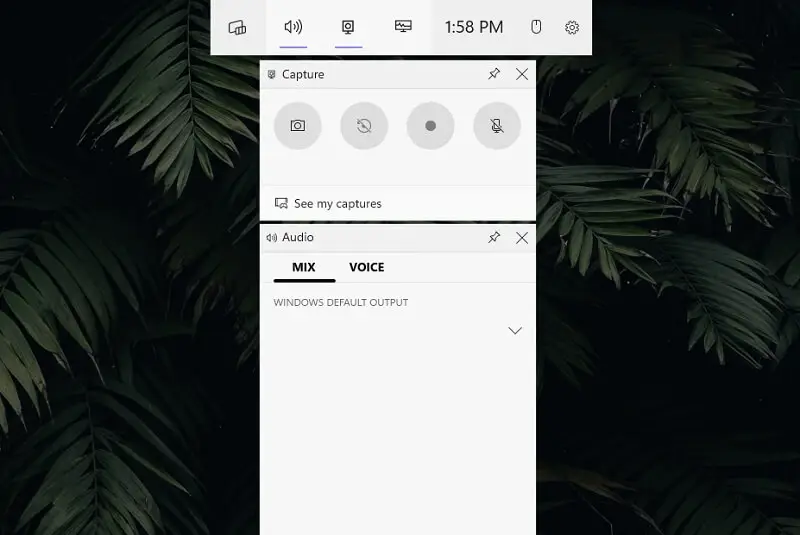
- To open the app overlay, press the Windows key + G on your keyboard.
- Hit the "Record" button or use the shortcut Win + Alt + R to initiate the recording.
- When you are done, tap "Stop" or press Win + Alt + R again. Your recording will then be saved to your "Videos" folder by default.

Key features:
- Audio Recording. Can record computer screen, system sounds and your voice simultaneously.
- Performance Monitoring. Displays real-time PC metrics, such as FPS (frames per second), CPU, and GPU usage.
- Background Recording. Enables background recording to automatically save the last few minutes of gameplay.
- Game Overlay. Access screen recording with audio, screenshot, and performance monitoring tools without leaving your game.
- Broadcasting. Stream your gameplay live to platforms like Twitch or YouTube directly from the program.
- Simple Interface. Easy to use, designed for gamers with minimal configuration needed.
Loom
Loom is a user-friendly screen recording tool designed for quick video creation, popular among professionals for tutorials, presentations, and team communication.
How to screen record with audio in Loom
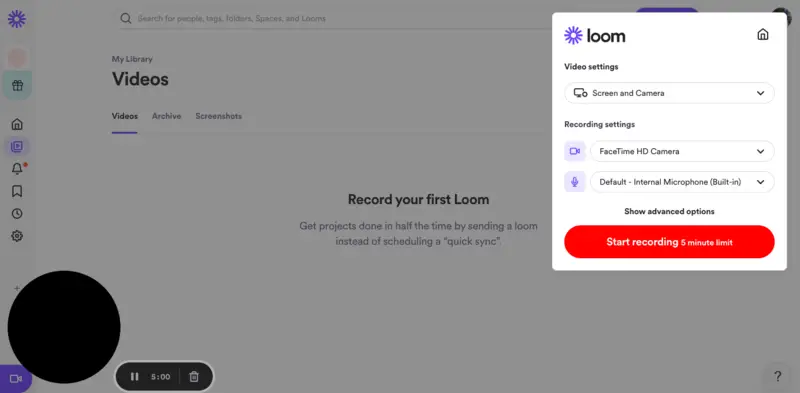
- Open Loom and click "New Video".
- Choose "Screen + Cam" or "Screen Only", and ensure your microphone is enabled.
- Select the window to capture and hit "Start Recording".
- When finished, hit "Stop Recording".

Key features:
- Instant Sharing. Results are uploaded automatically with a shareable link ready immediately.
- Easy Editing. Trim videos and add call-to-actions directly in the web app.
- Multi-Source Recording. Capture screen, webcam, and audio simultaneously.
- Viewer Insights. Track who watched your clips and for how long.
- Cross-Platform Support. Available on Windows, macOS, and as a Chrome extension.
Tips on how to screen record with audio
Optimizing video quality
- Choose a resolution that balances quality and performance. Common resolutions are 1080p (Full HD) or 720p (HD). 4K can be used if your hardware and internet bandwidth support it.
- For smooth video, aim for 30 or 60 frames per second if possible. Higher dimensions provide smoother motion but require more processing power.
- Set an appropriate bitrate to balance video quality and file size. For streaming, use a bitrate that matches your internet upload speed (e.g., 3000-6000 kbps for 1080p streaming).
- Use hardware encoding (e.g., NVENC for NVIDIA GPUs or AMD VCE) for better performance and lower CPU usage. Prefer software encoding (x264) for more control over quality but with higher CPU.
- Ensure good lighting for clear and vibrant video recording. Avoid backlighting and utilize soft, diffused light sources to minimize shadows and glare.
- Utilize a high-quality webcam or camera for better visual clarity. Verify it is set to the highest resolution and frame rate it supports.
Optimizing audio quality
- Position your microphone at an optimal distance—usually about 6-12 inches away from your mouth—to capture clear and natural sound.
- Angle the microphone slightly off-axis to reduce plosives (popping) from consonants like "P" and "B".
- Adjust the device's gain to avoid distortion. Place it high enough to capture your voice clearly.
- Keep a sample rate to 44.1 kHz or 48 kHz for professional audio quality.
- Apply noise suppression filters to reduce background voices.
- Try a noise gate to eliminate low-level sounds when you’re not speaking.
- Employ a compressor to balance the volume levels and prevent sudden audio spikes.
- Buy quality headphones to monitor audio in real-time and detect any issues like echo or distortion.
FAQ on recording computer screen with audio
- Is it possible to adjust the audio levels during screen recording?
- Yes, many programs let you set specific input levels before or during the process.
- Can I capture sound from one application only?
- Yes, some software allows you to record audio from specific apps or windows, not the entire system sound.
- How much storage space does a screen recording with audio take up?
- A 30-minute 1080p video may take up anywhere from 1.5GB to 5GB, depending on the frame rate, video compression settings, and other parameters.
How to record computer screen with audio - conclusion
In conclusion, recording your desktop with audio is a straightforward process that can significantly enhance your content creation.
Whether you opt for user-friendly program like Icecream Screen Recorder or advanced option like OBS Studio, the key to a successful capturing lies in understanding and optimizing both video and audio settings.
Remember to test your setup for screen recording with audio before starting a major project to fine-tune your preferences and achieve the best results.


