How to Record Video on PC: Step-by-Step Guide
Want to learn how to record a video on PC without feeling overwhelmed? Whether you need to capture your display for a video tutorial, save gameplay, or film a presentation, there are plenty of user-friendly programs available.
In this guide, we'll walk you through the easiest methods to record a video on a computer, recommend the best software for different needs, and share some tips to make your clips look professional—even if you're just getting started.
Icecream Screen Recorder
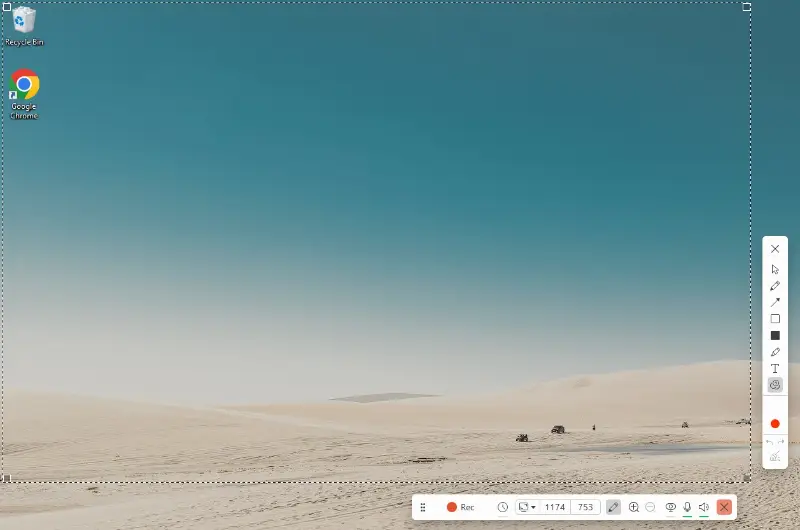
Icecream Screen Recorder is a simple, beginner-friendly program that allows you to capture any area of your monitor as a video or an image. It’s perfect for webinars, tutorials, gameplay, or even calls.
The software offers an intuitive interface, quick setup, and useful features like drawing during the process, scheduling sessions, and showing webcam alongside the screen.
How to record a video on PC with Icecream Screen Recorder
- Download the free screen recorder from the official website.
- Open the application and click the "Capture video" option.
- Select the area you want to record (full screen, a custom area, or a window).
- Choose your audio input (microphone, system sounds, or both). Turn on your webcam if you want to include it.
- Hit the "Rec" button and utilize the drawing tools if you want to highlight something.
- Press "Stop" when you’re finished and save the result.
Pros:
- User-friendly interface. The layout is straightforward and well-organized, making it easy for anyone to record a video on PC without spending time learning complicated settings.
- Simultaneous webcam. You can capture your activities while showing your face in a small overlay, ideal for tutorials, reaction videos, or online classes.
- Live annotation. You can draw shapes, add arrows, or highlight important areas directly on the screen, which is especially helpful for creating engaging educational content.
- Scheduled recordings. The software allows you to set a timer to begin and end the session automatically, which is perfect for capturing webinars or livestreams when you can't be at your computer.
- Hotkey customization. You can assign your own keyboard shortcuts for starting, pausing, and stopping the process, which saves time and improves workflow.
- Simple editing tools. It is possible to easily trim your videos to remove unwanted sections without needing a separate program.

OBS Studio
OBS Studio is a robust, open-source screen recording software designed for screen capture and live streaming. It caters to a variety of users, including gamers, educators, and professionals, offering powerful features without the need for a paid subscription.
With its flexible interface, the program allows you to create customized layouts, integrate different sources, and record high-quality content. Whether you're recording tutorials, broadcasting games, or producing live shows, this is a comprehensive solution.
How to capture a video on your PC using OBS Studio
- Download OBS Studio from the official website.
- Install and open the application.
- Click the "+" sign under the "Sources" panel to add desired displays or windows.
- Adjust your audio input and output settings in the "Audio Mixer" section.
- Press "Start Recording" to begin capturing.
- Once done, hit "Stop Recording" and save your file.

Pros:
- Customizable layout. The software gives you complete control over your workspace, allowing you to create unique setups with different scenes, transitions, and sources to suit your needs.
- Diverse source options. You can capture a wide range of content, including your entire screen, specific windows, applications, or game footage, all at once, making it adaptable for many use cases.
- Scene transitions. Easily switch between different scenes during recording or streaming, enhancing production value with smooth transitions and professional-looking results.
- Completely free. As an open-source tool, OBS is available at no cost, offering powerful features that are regularly updated by its development community.
- Supports HD output. The program ensures high-definition video quality with multi-channel audio, essential for top-notch content creation.
- Live streaming integration. It works with popular platforms like Twitch, YouTube, and Facebook Live, enabling you to broadcast content directly without needing extra software.
Cons:
- Challenging for beginners. Due to its vast array of features, OBS can feel overwhelming for new users, requiring time and effort to become familiar with the interface and settings.
- High resource usage. It can be demanding on your computer’s CPU and memory, especially during high-resolution videos, potentially affecting performance on older systems.
Bandicam
Bandicam is a compact and efficient tool that allows you to record a video on Windows PC. Perfect for creators and professionals, it enables seamless capturing of gameplay, tutorials, and presentations with minimal impact on system resources.
The software offers a variety of modes, giving users flexibility to save exactly what they need. The app is known for its intuitiveness, making it ideal for both beginners and advanced specialists.
How to use Bandicam to record a video on a PC
- Download Bandicam and open the program.
- Choose your preferred mode: Full Screen, Region, or Game.
- Set up your audio sources, selecting system sound and microphone if needed.
- Click the "REC" button to begin the process.
- Once done, hit "Stop" to end the session and save your video.

Pros:
- Optimized for performance. The software is designed to record videos smoothly without taxing your computer, ensuring high-quality output even on lower-end systems.
- Versatile modes. It supports various methods, allowing you to capture the entire screen, a selected screen region, or gameplay in full motion.
- Efficient compression. The program compresses footage efficiently, reducing file sizes without sacrificing visual clarity, which helps in managing storage space.
- Hardware acceleration support: The app uses GPU acceleration to enhance performance, ensuring that videos remain smooth with minimal frame drops.
- Timed feature: You can schedule sessions to start and stop at specified times, ideal for capturing live streams, webinars, or other events when you're not available.
Cons:
- Limitations. The free edition includes watermarks and has a recording time limit, which might be restrictive for those needing unrestricted functionality.
- Lack of editing tools. The application is focused solely on capturing, meaning that any video editing must be done through third-party software.
- Windows-only platform. Currently, it is only available for Windows, so macOS and Linux users will need alternatives.
VSDC Free Screen Recorder
VSDC Free Screen Recorder is a streamlined yet powerful choice designed for detailed video capturing on Windows computers. Utilizing hardware acceleration, it delivers smooth, high-frame-rate footage ideal for gaming, webinars, or demonstrations.
One of its standout capabilities is simultaneous recording from multiple audio sources, allowing system sounds and microphone input to be captured together - perfect for commentary or video guides.
How to make a video on a computer with VSDC Free Screen Recorder
- Start the program once installed to reach the main control panel.
- Opt to record either the full display or a defined segment.
- Turn on webcam and microphone features to include face video or narration.
- Open the configuration menu to modify sound levels, select the desired webcam, and set the destination folder for saved files.
- Click the record button to start. A timer will show elapsed time.
- Utilize the sketch tool to highlight or mark areas.
- Press the stop control to finish. The footage is automatically saved to the specified location.

Pros:
- High-definition. Records videos at resolutions up to 4K with smooth frame rates, ensuring sharp and detailed clips.
- Multi-device compatibility. Supports input from external sources like webcams, microphones, and capture cards.
- User-friendly interface. Designed with simplicity in mind, making it accessible to both beginners and experienced users.
- No watermarks or time restrictions. Offers unlimited duration without embedding any branding on the videos.
- Free access. All features are available at no cost, without requiring paid upgrades or subscriptions.
Cons:
- Basic editing capabilities. Includes only fundamental functions, requiring separate software for advanced modifications.
- Windows exclusive. Only compatible with Windows operating systems, leaving out macOS and Linux.
- Challenges on older systems. May experience slowdowns or frame drops on less powerful hardware.
- No screenshot function. Does not provide the option to capture still images within the application.
Built-in tools to record video on computer
How to make a video on Windows PC
Xbox Game Bar is a built-in overlay tool in Windows 10 and 11 that lets you quickly capture your screen, monitor system performance, and even chat with friends without leaving your game or app.
Originally designed to record games, it works with most programs, making it a convenient option for casual screen recording.
- Press Windows + G on your keyboard to open the tool.
- Click the "Capture" button (a small webcam icon).
- Select "Start Recording" (the circle button) to begin the session.
- To stop, use "Stop Recording" or hit Windows + Alt + R.
- Your clip will be saved automatically in the Videos > Captures folder.

Limitations:
- The software can only record individual application windows, not the full desktop or system-level overlays. If you need to capture multiple programs or your file explorer, you'll need another tool.
- On lower-end PCs, running the Game Bar alongside heavy apps (like games or video editors without watermark) can slightly affect system performance, causing minor lag or frame drops.
- The clips are stored in relatively large MP4 files without much video compression control, which can quickly consume storage space if you're working with long projects.
Screenshot Toolbar
On macOS, recording is handled through the Screenshot Toolbar, introduced in Mojave (10.14) and available in later versions. By pressing a quick keyboard shortcut, you can capture part of your monitor or the full display, as well as take screenshots.
How to record a video on a macOS computer using Screenshot Toolbar
- Press Command + Shift + 5 to open the toolbar.
- Choose either the entire screen or a selected portion.
- Click "Options" to adjust settings like microphone, timer, or a save location.
- Hit "Record" to start capturing.
- To stop, use the small button in the menu bar at the top of the display.
- Find your clips saved automatically to your chosen location (default is the desktop).

Limitations:
- While you can trim videos afterward, you can't add text to video, transitions, or text without another app.
- You can't record webcam alongside the screen directly with the toolbar; you would need a separate app for that.
Common issues when recording videos on PC
Even with reliable tools, creating a smooth video can come with challenges. Here are some typical problems users encounter and simple solutions.
Choppy or stuttering footage
Close unnecessary apps and background processes to boost performance. Adjust the resolution or frame rate to lower settings to lower the strain on your computer.
Audio and video not syncing
Verify that your recording program is properly configured with the right input sources. Reduce system load by shutting down other programs and check for updates in the software.
Large files
Use compression tools or change settings to capture at a lower resolution or bitrate. You can also split longer clips into smaller ones to manage storage more efficiently.
No system sound
On Windows, make sure you have the necessary drivers for system audio. On macOS, enable the right permissions to record internal sound.
Blurry or pixelated results
Match the resolution with your display settings for clarity. Increase the bitrate and frame rate to improve image quality.
Not saving properly
Check available storage space before starting the session. If the problem persists, try changing the output location and ensure your program is correctly set up.
Unexpected crashes or freezes
Ensure your system meets the software's requirements and keep drivers up to date. Close unnecessary background tasks and consider lowering quality to reduce the chance of interruptions.
Conclusion
Recording various videos on your PC doesn’t have to be complicated.
With the right tools and a little preparation, you can capture high-quality screen recording for work, school, or personal projects. Start by choosing app that fits your needs and experiment with your settings. Don’t be afraid to try a few different methods until you find the one that feels most natural.
Now that you know exactly how to take a video on computer, you're ready to create content easily and confidently.

Expert Tech Writer
